About this book
This book gives an introduction to design and creation of graphical user interfaces using the GTK widget tool-kit and the Nim programming language. The book has its focus on the Linux operating system (OS). While the Nim programming language does support all major operating systems, GTK has it main emphasis on the Linux OS. Windows and macOS are supported by GTK, but without a true native look and feel. Android and iOS are not supported by GTK, but there is some early experimental support for the Librem mobile devices manufactured by the Purism company. As GTK is compact and has a modular design, it can also be used on devices with restricted resources like the Raspberry Pi family. While GTK is generally not used to create web applications, it may be possible to run GTK applications locally in a web browser by using the broadway GTK backend.
The examples in this book use the Nim implementation of the team around Mr. A. Rumpf in version v1.6, the first GTK 4 version that is available in late 2020, and the Nim GTK bindings provided by the gintro package in version 0.9.9. For other Nim implementations or different GTK bindings modifications of the provided examples can be necessary.
Graphical User Interfaces
GTK is the name of a toolkit for the design and creation of graphical user interfaces (GUIs) that allow users to interact with computer programs through the use of graphical elements like buttons, sliders, drop-down menus, and input fields. These elements are called widgets. Widgets can be grouped to build larger entities like file or message dialogs. The top-level widget is generally a rectangular container called a window that contains all the other widgets. The initial release of GTK appeared in the year 1998, named GIMP tool-kit and was labeled GTK+. As the Name GTK implies it was closely bound to the famous GIMP drawing program (GNU image manipulation program) and was intended to replace the older Motif Unix GUI for GIMP.
Graphical user interfaces were introduced already a few decades after the invention of computers with the goal to simplify the interaction between humans and computers by replacing the traditional terminal-based textual user interfaces. GUIs allowed even untrained people the intuitive interaction with computers without the need to learn and remember many textual commands. Closely coupled to graphical user interfaces is the computer mouse, a small gadget that rests on the table and maps its movements to a pointer drawn on the computer screen, allowing the interaction with the widgets. Today, the computer mouse is often supported or substituted by touchpads or touch displays.
After the release of GTK, that toolkit was used by other software too, and in 2002, Version 2.0 of GTK appeared. GTK 2 had already a more modular design and was not that tight couple to GIMP. In 2011, GTK 3.0 appeared, which provided many new features. Most important was a new customizable design supported by cascading-style-sheets (CSS), and the use of libraries like Cairo for drawing the graphical elements and of Pango for font rendering. In late 2020, the official release of GTK 4 will appear, which has again an improved internal design, an improved application programming interface (API), and which supports OpenGL and Vulkan hardware drawing for the widgets to maximize performance while keeping CPU load low.
While GTK can be used on Windows and macOS computers, it is generally used on Linux, and there often in conjunction with the Gnome desktop environment. The Gnome foundation is the most important supporter of GTK development. GTK does not support the Android or iOS operating systems for mobile devices. The GTK related libraries use the LGPL software license, while the Nim compiler and most of Nim’s external packages are using the MIT software license. Both licenses allow the creation of proprietary closed source software, as long as for the LGPL licensed libraries dynamic linking is used.
Like most traditional GUI toolkits, GTK uses a retained mode, where the graphical scene is updated and redrawn only when necessary. In contrast to retained mode GUIs in the last years immediate mode GUIs have become popular. These GUIs often have their origin in simple GUIs for games and redraw the whole scene permanently, generally synchronized with the screen refresh rate. The permanent redraws create some CPU load of course, but for games that does generally not matter, as CPU and GPU load are dominated by the game itself, and with OpenGL or Vulkan hardware support, drawing the GUI does not cause high CPU load. And finally, the modern retained mode GUIs like GTK are not really that static any more, as they contain many animations. So, the distinction between retained and immediate-mode GUIs is not that sharp.
The GTK toolkit has a modular design with these main components:
- GTK
-
Initially GTK+, the GIMP tool kit. The GTK module builds the core of the GTK widget tool kit and contains all the widgets.
- GDK
-
The gimp drawing kit. High-level drawing related functions and data types.
- GdkPixbuf
-
Loading and manipulation of images.
- GObject
-
The GObject module provides an API for object orientated programming (OOP) in the C programming language.
- GLib
-
GLib provides many supporting functions and advanced data types.
- GIO
-
Support for input and output operations including asynchronous operations.
- GSK
-
The GTK Scene Graph Kit is used to optimize the drawing and the widget refresh.
- Graphene
-
Math support like vectors and matrices.
- ATK
-
Accessibility support like screen readers or text magnifiers.
Other GTK related modules are GtkSourceView for advanced text layout support as used for text editors like gedit, the rsvg module for support of scalable vector graphics (SVG) and the VTE module for the creation of terminal windows. GtkSourceView and VTE are not yet available for GTK4.
Additional GTK uses these libraries for drawing and font rendering:
- Cairo
-
Scalable vector drawing
- Pango
-
Font rendering
- OpenGL, Vulkan
-
GPU supported graphics
For Linux systems, there is one more abstraction layer between the GTK toolkit and the computer hardware, called Wayland. Wayland is a communication protocol that specifies the communication between a display server and its clients, as well as a C library implementation of that protocol. Some older Linux systems may still use instead of modern Wayland the legacy X Window System, which was sometimes just called X11 or X. The X Window System provided a basic framework for a GUI environment: drawing and moving windows on the display device and interacting with a mouse and keyboard.
All these components are written in the C programming language. C is a very old, restricted and sometimes unsecure language, which can lead to very verbose code, which is difficult to maintain. As GTK has an object-orientated design, but C language does not support OOP style, a whole object system called gobject was written for GTK from scratch. And as C does not support high-level data structures like resizable strings, hash maps, asynchronous in-out operations and much more important functionality which modern languages generally provide, this was also written from scratch and is provided in supporting libraries like glib and gio. As C does not support automatic memory management, in GTK it is sometimes necessary to release memory manually, which may lead to the well-known problems like memory leaks or use after free issues.
It seems to be obvious that all these bloated legacy stuff is nearly unmaintainable considering the tiny GTK and Gnome community. And today, when we have so many nice modern programming languages available, nearly no one intends to write apps in C. When we take into account the fact that GTK does not even support the popular Android OS for mobile devices, we may ask why we should care for GTK at all still.
Indeed, a popular competitor of GTK is the Qt GUI toolkit with its KDE Linux desktop environment. Qt appeared already in 1995 with a license model not well suited for free open-source software (FOSS), and is now available in version 6 with much less restricted licenses. Qt is written in C++ and is unfortunately even much more bloated than GTK, and it uses a so-called meta object compiler (MOC) as some form of C++ preprocessor. Qt is really very large and includes a lot stuff which is not really GUI related like network, web and database functionality or support for many custom data types. All that is also available by modern C++ or specialized libraries, so Qt can be regarded as a bloated application framework that is nearly a whole operating system. The advantage of Qt is that it is active developed and supports all important operating systems including the mobile Android and iOS systems with a native look and feel.
As the proprietary operating systems like Windows, macOS, Android, and iOS have all their own native GUI, we do not need a separate toolkit when we plan to develop apps for only one of these systems. And indeed, users generally prefer apps that only use the native GUI and avoid additional layers like GTK or Qt.
For many Windows or macOS users, GTK has the disadvantage that GTK draws all it widgets itself, it does not use the native graphical elements of the proprietary systems. GTK allows theming by use of cascading-style-sheets (CSS) so it can be tuned to look not too strange on Windows and macOS, but look and feel generally does not really map to native apps. Qt draws its widgets itself on Linux, but can try to use native elements on Windows or macOS since version 4.0, which may provide a more native look and feel.
One more important GUI toolkit is wxWidgets, which uses GTK on Linux and native GUI elements on Windows and macOS. Some people like wxWidgets as it is a really cross-platform GUI toolkit with native look and feel, but at least for Linux it is just one more layer on top of GTK. And it does not support the mobile operating systems Android and iOS.
Besides the large toolkits Qt and GTK there exists many more smaller ones, as the already mentioned wxWidgets, the FLTK toolkit written in C++, or the old and plain ones like LessTif or TK.
And finally, we have always the option not to use a GUI toolkit at all but to create a GUI based on HTML and JavaScript which can be used with web browsers.
The fact that GTK is written in C and so is very hard to maintain is at the same time a large benefit: As C is a simple language without advanced concepts like classes, templates, inheritance, or automatic memory management, it is generally very easy to create bindings to C libraries from other programming languages. For GTK this fact is even supported by the GTK gobject-introspection database which allows to create bindings to all the GTK related libraries in a semi-automatic process.
So the majority of all the new modern computer programming languages have bindings to the GTK toolkit. For Qt which is written in C++ it is much more difficult to create bindings, as C concepts like C classes, templates and the MOC preprocessor makes automatic bindings generation difficult.
So Qt is mostly used direct from C++, or its well supported Python bindings are used. Qt language bindings for many other programming languages exists, but it is hard to keep them up to date. Sometimes Qt GUIs are also created with QML, which allows to create user interfaces in a declarative manner. QML bindings are available for various programming languages.
While GTK is still used often directly from C, it provides a larger set of official supported languages bindings which include C++ (gtkmm), JavaScript, Python, Rust, Perl, and Vala. D and Go are also well supported, and for many other programming languages at least bindings for a subset of GTK exists.
In this book, we will use gobject-introspection based bindings to write GTK apps in the Nim programming languages. Nim is a modern compiled statically typed language, that can generate fast native executables from clean high-level source code. As Nim does not enforce OOP design with inheritance as languages like Java do, our Nim examples follow the original C examples provided by GTK core developers. Some other modern languages like Go or Rust use generally a similar approach and do not enforce OOP and inheritance, while classical OOP languages like Java, Python or Ruby generally enforce the use of classes and inheritance for GTK apps. C++ with its gtkmm GTK bindings also push its users to OOP design.
We will use for this book semi-automatic generated GTK 4 and GTK 3 bindings which are generated by the gintro package, where g stands for all the gtk related libraries and intro for introspection as the bindings are generated by use of gobject-introspection.
You should be aware that for the Nim programming language many more GUI toolkits are available, some based also on GTK but with a different API design, and some based on other libraries or written directly in Nim like the NimX module.
- Winim
-
Nim’s Windows API and COM Library (https://github.com/khchen/winim)
- wNim
-
Nim’s Microsoft Windows GUI Framework (https://github.com/khchen/wNim)
- wxnim
-
Nim wrapper for wxWidgets (https://github.com/PMunch/wxnim)
- Fidget
-
Fidget - A cross-platform UI library for nim (https://github.com/treeform/fidget)
- Fidgetty
-
Widget library built using a fork of Fidget written in pure Nim and OpenGL rendered. (https://github.com/elcritch/fidgetty)
- Owlkettle
-
A declarative user interface framework based on GTK 4 (https://github.com/can-lehmann/owlkettle)
- NiGui
-
Cross-platform desktop GUI toolkit written in Nim (https://github.com/simonkrauter/NiGui)
- GenUI
-
This is what might become a really kick-ass cross-platform native UI toolkit (https://github.com/PMunch/genui)
- nimx
-
Cross-platform GUI framework in Nim (https://github.com/yglukhov/nimx)
- WebGui
-
Web Technologies based Crossplatform GUI Framework with Dark theme (https://github.com/juancarlospaco/webgui)
- nimgui
-
cimgui bindings for Nim (https://github.com/zacharycarter/nimgui)
- nfltk
-
Nimized Fast Light Toolkit (https://github.com/Skrylar/nfltk)
- IUP
-
iup wrapper for Nim. Used to be part of the stdlib, now a Nimble package. (https://github.com/nim-lang/iup)
- NimQML
-
Qt Qml bindings for the Nim programming language (https://github.com/filcuc/nimqml)
- ui
-
Beginnings of what might become Nim’s official UI library (https://github.com/nim-lang/ui)
- uibuilder
-
UI prototyping with Glade (https://github.com/ba0f3/uibuilder.nim)
- sciter
-
Nim bindings are work in progress (https://sciter.com/forums/topic/nim-bindings-for-sciter/)
- nim-nanovg
-
Nim wrapper for the NanoVG vector graphics library for OpenGL (https://github.com/johnnovak/nim-nanovg)
- rdgui
-
A modular GUI toolkit for rapid (https://github.com/liquidev/rdgui)
- nodesnim
-
The Nim GUI/2D framework, based on OpenGL and SDL2 (https://github.com/Ethosa/nodesnim)
- neel
-
A Nim library for making Electron-like HTML/JS GUI apps (https://github.com/Niminem/Neel)
- mui
-
microui, a tiny immediate-mode ui library (https://github.com/Angluca/mui)
Some of these bindings may currently not compile with the latest Nim compiler or may not support the new ARC memory management. But we recommend to investigate them before you decide to use gintro, maybe one of them fits better your needs. wNim should be a good choice when you intend to develop for windows only, nimx may be the most fun as it is pure Nim, fidget looks really nice, nigui supports native look for Windows, and finally nimgui is a bindings to the dear imgui immediate mode library. Most of the above bindings are hosted at GitHub, you can use GitHub, Google or Nimble search to locate the packages.
Introducing GTK
Note that we assume for this book that you are already familiar with computer programming in general and with the Nim programming language. At least you should be able to open a terminal window and to enter and execute some commands. Some basic knowledge of the C language would also help, as we sometimes use C code as a starting point for our Nim programs.
GTK is an event-driven toolkit. That is, we create widgets like buttons or text entry fields and connect them with one or multiple functions, which are then automatically called when an input event like a button press or a text entry is discovered by GTK.
For creating a GUI we create and arrange all our widgets, and then connect widget actions with our handler functions, called callbacks. The callback can perform arbitrary tasks, this includes modifying the GUI by changing the appearance of widgets, or by removing widgets or by adding new widgets.
Generally GTK does manage the actual layout of the widgets automatically for us, that is widgets are automatically arranged and resized to create a clean nice look, and when we resize the top-level window or add or remove widgets, the layout adapts itself automatically. This behavior is archived by the boxes in boxes concept represented by GtkBox — we create vertical or horizontal boxes, which we can fill with widgets, and we can put these boxes again in other larger boxes in a recursive manner. In this way, we can specify the desired layout, but the concrete layout is done automatically. For example, buttons can resize automatically when the label text or font size change. The horizontal or vertical boxes are supported by two-dimensional grids or by special containers like header bars. We can tune the layout by specifying margins or distances between widgets, or we can modify the visual appearance with CSS. But generally, we do not create layouts where we specify exact pixel positions for GUI elements. GTK also offers a fixed positioning and sizing model, using the GtkFixed and the GtkLayout containers, but that is used only in rare cases. Recently, GTK also got a new constraint-based layout manager developed by Emmanuele Bassi, which may allow to easily create even more flexible layouts.
We can create the desired widgets directly in our Nim source code, for example by a call of newButton("Sort List"), or we can decide to create all the widgets in a declarative fashion in external XML files. In the XML files we can arrange and group all of our widgets in hierarchical layouts, and we can attach attributes like size, color or textual labels to the widgets. We can create that XML file manually, or we can decide to use the interactive Glade tool to create the XML file.
Using XML files and the Glade tool may appear simpler, more intuitive and more flexible. When we create GTK programs directly in the C languages that may be true, as C is a cryptic and verbose languages, which makes changes really difficult. For high-level languages like Nim or Python that is not really the case, so it is not always clear, if the use of external XML files really have a benefit. XML based layouts have the advantage that the GUI layout can be modified without recompiling the program source code, so even users that do not have the source code of a program can modify the GUI layout. But this is only an advantage when we do ship our software without source code, and when we use the XML files in its original form as external text files. But in most cases, we integrate the XML files again into our main executable to simplify the deployment. An additional disadvantage of the use of XML files is that the Glade tool may not support all widget types and their properties well, so that manual modifications of the XML files can be necessary.
So for the first part of this book, we will create our GUI layout directly in the Nim source code. Later we will introduce the use and layout of the XML files, and we will describe how the GTK builder library component is used to import the XML files and to access the widgets.
Installation of GTK
When you are interested in using GTK with Nim, then we should assume that you have both already installed on your computer and have played with them.
For Nim, you will find detailed installation instructions on the Nim homepage: https://nim-lang.org/install.html
On Linux computers, GTK is generally installed by default, or at least made available by the package manager of your Linux distribution. If you still have an old Linux system that does not yet provide GTK4, you may install it beside your GTK3. For example, you may install the latest GTK4 from git with these commands entered in a Linux terminal window:
# https://discourse.gnome.org/t/installing-gtk4-for-testing-on-opt-ii/3349/4
git clone https://gitlab.gnome.org/GNOME/gtk.git
cd gtk
meson --prefix /opt/gtk builddir
ninja -C builddir
ninja -C builddir install

# maybe also necessary:
export GI_TYPELIB_PATH=/opt/gtk/lib64/girepository-1.0
export LD_LIBRARY_PATH=$LD_LIBRARY_PATH:/opt/gtk/lib64/
export PKG_CONFIG_PATH="/opt/gtk/lib64/pkgconfig/"

# you may test your installation with:
GSETTINGS_SCHEMA_DIR=/opt/gtk/share/glib-2.0/schemas /opt/gtk/bin/gtk4-demo
The installation of GTK for Microsoft Windows is described on the GTK home page:
and for macOS:
If you have problems with the installation, then you may ask for support at the GTK Internet forum:
In the rest of this book, we assume that you have also installed the Nim compiler and a C compiler like gcc or clang.
When you have not yet installed the Nim GTK bindings, then you may enter in a terminal window:
nimble install gintro
The gintro package generates the bindings between the GTK libraries and the Nim language locally on your computer by querying the gobject-introspection database. The generated modules depend on your operating system (Linux, Windows, Mac, 32 bit, 64 bit) and on the available GTK version. If you update your GTK system, it may be necessary to update gintro by nimble uninstall gintro; nimble install gintro. Executing that sequence is also recommended when a new gintro release is available. You can also use nimble install gintro@head to get the latest gintro with the latest, less tested fixes.
Legacy Program Layout
GTK 3 introduces the GtkApplication framework, which is continued in GTK 4 and is generally the recommended way to create GTK applications. Programs based on GtkApplication seem to be a bit more complicated than the ones with legacy GTK 2 startup code, but the GtkApplication style offers some benefits like management of multiple program instances, parameter passing, and it enables new modern layouts with header bars and hamburger menus. So we will use the GtkApplication style in the rest of this book.
As you will still find many example programs that still use the old GTK 2 program startup code, we will present that program shape here first. The following C program, called simplegtk3.c, uses the old GTK 2 style and can be compiled with this command:
gcc -o simplegtk3 simplegtk3.c `pkg-config --libs --cflags gtk+-3.0`
You can run it from a terminal window with this command:
./simplegtk3
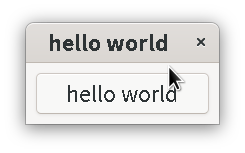
The program will open a tiny window containing a single push button. Clicking that button will write a message to the terminal window. You can terminate the program by clicking with the mouse on the cross in the upper right corner of the program window.
// based on https://gitlab.gnome.org/GNOME/gtk/-/blob/master/tests/simple.c
// gcc -o simplegtk3 simplegtk3.c `pkg-config --libs --cflags gtk+-3.0`

#include <gtk/gtk.h>

static void
hello (void)
{
  g_print ("hello world\n");
}

int
main (int argc, char *argv[])
{
  GtkWidget *window, *button;
  gtk_init(&argc, &argv);
  window = gtk_window_new(GTK_WINDOW_TOPLEVEL);
  gtk_window_set_title (GTK_WINDOW (window), "hello world");
  gtk_window_set_resizable (GTK_WINDOW (window), FALSE);
  g_signal_connect(window, "destroy", G_CALLBACK(gtk_main_quit), NULL);
  button = gtk_button_new ();
  gtk_button_set_label (GTK_BUTTON (button), "hello world");
  gtk_widget_set_margin_top (button, 10);
  gtk_widget_set_margin_bottom (button, 10);
  gtk_widget_set_margin_start (button, 10);
  gtk_widget_set_margin_end (button, 10);
  g_signal_connect (button, "clicked", G_CALLBACK (hello), NULL);
  gtk_container_add (GTK_CONTAINER (window), button);
  gtk_widget_show_all (window);
  gtk_main();
  return 0;
}
The source code has the typical structure of GTK 2 programs written in C language: The first two lines are only comments, it follows an include directive to make the gtk library available. The program consists of two functions: the C main() function which is executed automatically at program startup, and a callback function called hello(). As usual for C programs, the main() function has two parameters: an array of optional command-line parameters and the number of parameters. These two parameters are passed to the gtk_init() function, which has to be called at the beginning of an old style GTK program. In the main() function, a new top-level window instance is created by calling gtk_window_new(). Then we set the window title, and we set the resizable property to false to give that window a fixed size. Then the function g_signal_connect() is called to connect the "destroy" signal to the predefined callback function gtk_main_quit() provided by gtk. The destroy signal is emitted for the window by GTK when we click with the mouse on the window close symbol. In this case gtk_main_quit() terminates the whole program. After this, we create a button instance and set some properties of the button, like its label text and its margins, to reserve some space between the button and the border of the enclosing window. We connect the "clicked" signal of the button instance to our hello() callback and add the button to the window. We have to call gtk_widget_show_all() to make the window and its parents visible. Finally, we call gtk_main() to transfer control to the GTK main loop. That loop now runs as some form of supervisor, waiting for user actions and calling the connected callback when appropriate. When the user clicks the close button of the window, the program terminates, the top-level window is closed, the GTK main loop stops, and the last line of the C main() function returns the value 0 to the operating system to indicate that no error has occurred.
A few remarks about the above program: All the GTK widgets are objects, which GTK creates for us by calls like gtk_button_new(). These "constructor" calls return a pointer to the widget, and we use this pointer to access and interact with the widget later. The GTK widgets build a hierarchy with parent/child inheritance in OOP fashion. The basic GTK widget is a subclass of the gobject object, and other widgets like windows or buttons are again subclasses of widget. In GTK C code, the widget is generally used as the static base type. So when a button widget is used, then a variable of type widget is declared and gtk_button_new() returns not a button instance but the plain widget type. This has the consequence that whenever we use a button function on that instance, we have to cast the widget to a button type, as in gtk_button_set_label (GTK_BUTTON (button), "hello world)". That is a convention chosen by the initial GTK creators. Note that in C casts like GTK_BUTTON() do type checks at runtime and give runtime warnings when the types do not match. We may wonder if we have to free widgets when we do not need them any longer. Indeed, in C code, that can be necessary in some cases. GTK uses reference counting for its objects, meaning that each object has a reference counter. In C, we can increase that counter to "reference" an object, that is, to ensure that it is kept alive and is not destroyed by GTK. When we do not need that object any more. we can decrease the reference counter. If the reference counter drops to zero, then GTK destroys the object, that is GTK frees its memory and closes related resources. But often we do not have to really care for that. The reason for that is that GTK uses a special variant of reference counting: When we create a widget with a constructor like gtk_button_new(), we get an instance that is marked as "floating". indicating that the instance is not already owned by someone. Generally, we insert each widget that we create into another widget, like a window or another container widget, and that container widget then takes ownership of its child. When we destroy a container or when our program terminates and the top-level window is destroyed, then all its children are automatically freed. So we have not to care about all that memory management in this case. But there are exceptions to this process, so C programmers sometimes have to carefully check when they have to ref() and unref() resources. Fortunately, high-level languages like Nim or Python have a garbage collector that frees all objects when appropriate, so we do not have to worry about this. Nim with gintro supports even the new ARC memory management, which is deterministic and scope based: When a widget or another object goes out of scope, it is immediately freed, and all related resources are closed or released.
In the code above, we use the function g_signal_connect() to connect widgets to a user defined callback function. The signal type like "clicked" is not an enumeration type, as we may have expected, but a string. The string data type shall enable the extension of the signal system — with enums, that would not be possible. The g_signal_connect() function allows additional user data to be passed in the form of a plain void pointer to the callback functions. If there is no data parameter, then NULL is passed. Fortunately, in Nim, we can do the optional parameter passing in a type-safe way.
Another aspect that we should discuss is the margin size that we have specified for our button. The margin is the void area around a widget. The literal value 10 used in the set_margin() functions is a pixel size, as the GTK API is for historic reasons pixel based. Today, where displays with very high DPI resolution are available, the pixel is not always a good size unit. Distances like margins are generally related to text size, so size units like em or ex for the size of letters as used in HTML and CSS would be a more flexible size unit. To allow using of GTK on screens with very high DPI values, GTK3 and GTK4 use logical pixels, as opposed to physical ones. This means the user can configure the desktop environment to scale the pixel size, generally by factor 1 for ordinary displays and by 2 for high DPI displays. Fractional scaling factors are not yet supported, so this does not really allow a fine tuning of the visual layout. Generally, you should know that what really matters is not the DPI value but the viewing angle: When you have a large display with a low DPI value and you move it away from your eyes, it will appear like a smaller display with a higher DPI value.
Now let us investigate how the above C program looks for GTK4:
// https://gitlab.gnome.org/GNOME/gtk/-/blob/master/tests/simple.c
// gcc -Wall simple.c -o simple `pkg-config --cflags --libs gtk4`

#include <gtk/gtk.h>

static void
hello (void)
{
  g_print ("hello world\n");
}

static void
quit_cb (GtkWidget *widget,
         gpointer data)
{
  gboolean *done = data;
  *done = TRUE;
  g_main_context_wakeup (NULL);
}

int
main (int argc, char *argv[])
{
  GtkWidget *window, *button;
  gboolean done = FALSE;
  gtk_init ();
  window = gtk_window_new ();
  gtk_window_set_title (GTK_WINDOW (window), "hello world");
  gtk_window_set_resizable (GTK_WINDOW (window), FALSE);
  g_signal_connect (window, "destroy", G_CALLBACK (quit_cb), &done);
  button = gtk_button_new ();
  gtk_button_set_label (GTK_BUTTON (button), "hello world");
  gtk_widget_set_margin_top (button, 10);
  gtk_widget_set_margin_bottom (button, 10);
  gtk_widget_set_margin_start (button, 10);
  gtk_widget_set_margin_end (button, 10);
  g_signal_connect (button, "clicked", G_CALLBACK (hello), NULL);
  gtk_window_set_child (GTK_WINDOW (window), button);
  gtk_widget_show (window);
  while (!done)
    g_main_context_iteration (NULL, TRUE);
  return 0;
}
The most important difference is the fact that gtk_main() is not called at the end of the C main() function, but g_main_context_iteration() is called in a loop. The user has to provide a way to terminate that loop to exit the program. The above program does that by calling an additional function called quit_cb() that is called when the top- level window is going to be destroyed (the user clicks on the x symbol of the main window), and that sets the done variable of the C main() function to the value true. The function g_main_context_iteration() has two parameters: a GMainContext, for which we pass NULL to get the default one, and a boolean value that determines if that function may block or not. In the quit_cb() callback, the function g_main_context_wakeup() is called. That function also has a parameter named context of type GMainContext; here NULL is again passed to use the default one. The function g_main_context_wakeup() ensures that context is not blocking in the g_main_context_iteration function.
Other less important differences are that gtk_init() and gtk_window_new() do not have function parameters in GTK4, that gtk_window_set_child() is used instead of gtk_container_add() to set the child widget of the top-level window, and that gtk_widget_show() is used instead of gtk_widget_show_all() to make the widgets visible.
Now let us create a Nim version of the C code above: We may use the tool c2nim to generate a nimified version of the C source code, and tune it a bit manually, resulting in this program:
##  https://gitlab.gnome.org/GNOME/gtk/-/blob/master/tests/simple.c
##  nim c simple.nim

import gintro/[gtk4, glib, gobject]

proc hello(b: Button) =
  echo "hello world"

proc quit_cb(window: Window; done: ref bool) =
  done[] = true
  wakeup(defaultMainContext())

proc main =
  var done = new bool
  gtk4.init()
  let window = newWindow()
  window.title = "hello world"
  window.resizable = false
  window.connect("destroy", quit_cb, done)
  let button = newButton()
  button.label = "hello world"
  button.marginTop = 10
  button.marginBottom = 10
  button.marginStart = 10
  button.marginEnd = 10
  button.connect("clicked", hello)
  window.setChild(button)
  window.show
  while not done[]:
    discard iteration(defaultMainContext(), mayBlock = true)

main()
The program structure follows closely the C program, there is no need to press the code in classes. The first two lines are only comments. It follows an import statement; we import the modules gtk4, glib and gobject unqualified into the global name space, as is common for Nim.[1] We have decided to call the function that contains the largest code part main(), but that name can be freely selected in Nim. And we have to call that function explicitly, there is no function that is called automatically in Nim. Most statements in the Nim program directly correspond to the statements in the C code. We use method call syntax for most function calls as common in Nim, that is instead of setChild(window, button) we write window.setChild(button). That may look like OOP style, but it is at the end just a syntax variant. The gintro module uses generally short unqualified function names, that is, newWindow() instead of gtk_window_new(). We could use a module qualifier like gtk4.newWindow(), but that is only necessary if some of the imported modules export the same symbol (with the same signature) so that name conflicts occur. The Nim compiler reports the rare name conflicts as errors, and we can add module prefixes to our Nim source code then. For the init() function of the gtk4 module, we have decided to use a module prefix from the beginning; for functions without parameters and with very short trivial names, the chance for name conflicts increases. And sometimes it is useful to indicate the origin of a function by use of a module qualifier. GTK widgets and the other gobject based types in GTK are objects that are dynamically created on the heap and accessed by pointers in the C code. The gintro Nim bindings create a Nim proxy object for each instance of these types. Nim constructors like newWindow() or newButton() create a Nim proxy object on the heap and return its reference; the proxy object is automatically destroyed when it is no longer needed by our Nim code or by GTK itself. The proxy object contains a pointer to the GTK object and some more fields for internal use. While the internal relationship between Nim’s proxy objects and GTK’s widgets and other gobject based types is not trivial, for the gintro user these types behave like ordinary Nim objects handled by Nim’s memory management system.
Contrary to GTK itself, the gintro constructors do not always return a reference to a plain widget, but they return the actual ref type, like Button or Window. For connecting GTK signals, the type safe connect() macro call is used, which accepts an optional typed argument. Currently, that optional argument can be a plain value like int or a reference to an arbitrary type, but var parameters are currently not supported. So we had to use a ref bool for the parameter of the quit_cb() callback function, as we want to modify the boolean value in the quit_cb() callback and access the modified value in the main() procedure. We have to de-reference the done variable with the dereference operator [] to access the content. The var parameter type should be needed only in very rare cases as the optional parameter of the connect macro — maybe gintro will support them later. The gintro connect macro is type safe; the data types of all parameters have to match with the data types used in the connected callback function. That is we have to pass a window or button parameter in the code above. The data type of the optional parameter has to match also of course. For most GTK signals, the parameter list of the callbacks consists only of the object itself and optional one more parameter, but there are some signals that have more parameters. One way to learn about these signals is to inspect the GTK C API. But we have to remember that the GTK widget family build a hierarchy, so we may have to look for the signals also in parent classes. For example, when we inspect the GtkButton API, we will find only two signals, clicked and activate: https://developer.gnome.org/gtk4/stable/GtkButton.html#GtkButton.signals. But as GtkButton is a child of GtkWidget we could also use signals from https://developer.gnome.org/gtk4/stable/GtkWidget.html#GtkWidget.signals for our button.
When we set properties or attributes, we have several options: we can use function or method call syntax, or we can use the equal sign to assign the value. For the setter procedure, we can generally use the short name without the set name component:
setTitle(window, "Hello")
title(window, "Hello")
window.setTitle("Hello")
window.title("Hello")
window.title = "Hello"
For setting some properties, like the default size of widgets, we can also use tuple assignment, as in the last two lines of this code:
setDefaultSize(window, 200, 200) (1)
gtk.setDefaultSize(window, 200, 200) (2)
window.setDefaultSize(200, 200) (3)
window.setDefaultSize(width = 200, height = 200) (4)
window.defaultSize = (200, 200) (5)
window.defaultSize = (width: 200, height: 200) (6)| 1 | proc call syntax |
| 2 | optional qualified with module name prefix |
| 3 | method call syntax |
| 4 | named parameters |
| 5 | tupel assignment |
| 6 | tupel assignment with named members |
The Nim program above still looks a bit bloated due to the four set margin calls, each with the same literal value of 10. Well, that program shape is a result of the initial C code, and often the 4 values are not really all identical. But when such code fragments should occur often in our code then we would define our own setMargin() procedure that would get one parameter and assign all four values for us, and we may define another procedure with four parameters to assign all 4 margins, we could call it with button.setMartin(10) and button.setMargin(top = 5, bottom = 5, left = 20, right = 20). Note that Nim supports default values for procedure parameters. The gintro package uses that fact for boolean properties, which generally have the default value true, so we can use a plain window.setResizable instead of window.setResizable(true). To set that property to false, we still have to use window.setResizable(false) or window.resizable = false.
Application Style
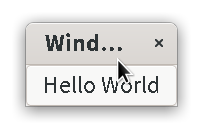
Let us now look at the new application program style that was introduced with GTK 3 and is nearly unchanged in GTK 4. We start with the GTK 4 variant of the example that is presented at the GTK homepage, its C code has this shape:
// https://gitlab.gnome.org/GNOME/gtk/-/blob/master/examples/hello-world.c
// gcc -Wall hello-world.c -o hello-world `pkg-config --cflags --libs gtk4`
#include <gtk/gtk.h>

static void
print_hello (GtkWidget *widget, gpointer data)
{
  g_print ("Hello World\n");
}

static void
activate (GtkApplication *app, gpointer user_data)
{
  GtkWidget *window;
  GtkWidget *button;
  GtkWidget *box;
  window = gtk_application_window_new (app);
  gtk_window_set_title (GTK_WINDOW (window), "Window");
  gtk_window_set_default_size (GTK_WINDOW (window), 20, 20);
  box = gtk_box_new (GTK_ORIENTATION_HORIZONTAL, 0);
  gtk_window_set_child (GTK_WINDOW (window), box);
  button = gtk_button_new_with_label ("Hello World");
  g_signal_connect (button, "clicked", G_CALLBACK (print_hello), NULL);
  g_signal_connect_swapped (button, "clicked", G_CALLBACK (gtk_window_destroy), window);
  gtk_box_append (GTK_BOX (box), button);
  gtk_widget_show (window);
}

int
main (int argc, char **argv)
{
  GtkApplication *app;
  int status;
  app = gtk_application_new ("org.gtk.example", G_APPLICATION_FLAGS_NONE);
  g_signal_connect (app, "activate", G_CALLBACK (activate), NULL);
  status = g_application_run (G_APPLICATION (app), argc, argv);
  g_object_unref (app);
  return status;
}
The main difference between the new application program style and the old GTK 2 style is, that the C main() function now creates an application, connects the application to various callbacks, and then calls g_application_run() to execute it. The most important callback is the activate callback, which creates the application window with all its widgets and connects callback functions to the widgets.
We can compile and run the above C program when we enter these commands in the terminal window:
gcc -Wall hello-world.c -o hello-world `pkg-config --cflags --libs gtk4`
./hello-world
The GTK3 variant of above program is nearly identical, instead of gtk_window_set_child(GTK_WINDOW(window), box) we would use the old gtk_container_add(GTK_CONTAINER(window), box) to set the box as content for the window, and to set the button as content of the box we would replace gtk_box_append(GTK_BOX(box), button) by gtk_container_add(GTK_CONTAINER(box), button). Another small difference is that GTK3 uses gtk_widget_destroy() instead of gtk_window_destroy() and gtk_widget_show_all() instead of gtk_widget_show().
After applying those modifications, you could compile the program for GTK3 with
gcc -Wall hello-world-gtk3.c -o hello-world-gtk3 `pkg-config --cflags --libs gtk+-3.0`
Note that we do not have to call gtk_init() when we use the application style.
In the C main(), function we create our application by calling the function gtk_application_new(). We pass a string that is used as an application id and some flag parameters. After we have connected the application variable to our activate callback function, we run the application by calling g_application_run() of the gio library. The application then runs until the application window is closed or until we call gtk_window_destroy() on it. We can pass the command line arguments as parameters to g_application_run(). The function returns an integer value as the status result, which is used as the return value of the main() function and passed to the operating system as the result of the program execution. In the C code, g_object_unref(app) is called before the status value is returned to the OS and the program is terminated. Earlier, we said that even in C code, we generally do not have to free objects or resources because most objects, like widgets, are initially unowned after creation, and when we add them to containers, the container takes ownership. For top-level windows or the GTK application, that is not the case, so their constructors return a none floating object with a reference count set to one, and we have to destroy() or unref() them.
In the activate() callback, we call gtk_application_window_new(app) to create a top level application window, which is a subclass of a GTK window. In the activate() callback, we create a box as a container for our button widget. Containers like boxes are used to arrange and group widgets. The GTK box constructor gtk_box_new() has two parameters: an orientation and a spacing value. The orientation determines if the contained widgets should be arranged vertically or horizontally. The spacing is an integer value that determines the distance between the contained widgets, the value is given in logical pixels. The box widget is then set as a child of the application window by calling the function gtk_window_set_child(). After that, we create a button widget with a "Hello World" label text and connect that button to a callback function called print_hello(), which shall print a message to the terminal window when we click with the mouse on that button. This program connects another callback function to our button in a very special fashion: When we click the button, we want our application window to close and the program to terminate. For that, we want to directly call the gtk_window_destroy() function on our application window as a callback function. The problem is that when we connect a callback function to a button, then GTK would pass the button instance as the first parameter to the callback. But we intend to call gtk_window_destroy() as a callback with our application window as a parameter. For this rarely used special case, GTK offers a variant of g_signal_connect() which is called g_signal_connect_swapped() and which passes the optional user_data parameter to the callback. In this way, we can pass the application window as user_data parameter directly to the gtk_window_destroy() function. In Nim, this form of swapped parameter passing is currently not supported, so we have to define our own function, which gets the window as optional parameter and then calls destroy() on it. After we have connected all the callback functions to our button, we call gtk_box_append() to insert the button widget into the box. Finally, we call gtk_widget_show() on our application window to make it and all of its children visible, and we are done.
We have created our application window, a box widget, and a button widget. We inserted the box as a child into the window, and we inserted the button widget into the box. Note that the order in which we build that hierarchy is not important; we can first insert the button into the box or first insert the box into the window. Also note that we can connect multiple callback functions to the same widget. In this case, the order is important, as the callback functions are called in the order in which they were connected. For our button, if we had connected the print_hello() callback function last, that one would never get called, as the window would have been destroyed before. Also note that we can connect different widgets to the same callback function, i.e., we could create multiple button widgets and connect them all to our print_hello() callback function.
Now let us see how the above program looks in the Nim programming language by using the gintro bindings. We applied the conversion tool c2nim on the above C code and slightly edited the result manually:
c2nim -o hello_world.nim hello-world.c
##  https://gitlab.gnome.org/GNOME/gtk/-/blob/master/examples/hello-world.c
##  nim c helloWorld.nim

import gintro/[gtk4, gobject, gio]

proc destroyWindow(b: Button; w: gtk4.ApplicationWindow) =
  gtk4.destroy(w)

proc printHello(widget: Button) =
  echo("Hello World")

proc activate(app: gtk4.Application) =
  let window = newApplicationWindow(app)
  window.title = "Window"
  window.defaultSize = (20, 20)
  let box = newBox(Orientation.horizontal, 0)
  window.setChild( box)
  let button = newButton("Hello World")
  button.connect("clicked", printHello)
  button.connect("clicked", destroyWindow, window)
  box.append(button)
  window.show

proc main =
  let app = newApplication("org.gtk.example", {})
  app.connect("activate", activate)
  let status = app.run
  quit(status)

main()
The Nim source code fully matches the C code. In most cases, we use method call syntax, and for window title and default size, we use an assignment instead of a procedure call to set the properties. For the newApplication() call, we explicitly specify the empty set for the flag parameter, but we could have left that out as it is the default. In the C code, gtk_application_new() passes plain integer flag values, which can be combined by bitwise or operations, and G_APPLICATION_FLAGS_NONE is passed when no bit flag should be set. In Nim, we use a bitset with a {} default for the empty set. Finally, we used the quit procedure of the system module to return the status result to the OS. The only small difference between the Nim code and the C code is that we do not use connectSwapped() but instead call an intermediate destroyWindow() procedure that obtains the application window as an additional parameter and calls destroy() on it to close the top-level window and to terminate the program. Providing a type safe connectSwapped() procedure for the Nim bindings seems to be hard, and we would need it only in rare cases in real world code. Note that for the connect() macro, the type of the optional parameter has to match exactly the data type used in the callback signature, that is while the body of the destroyWindow() procedure would work with a plain GTK window, which is a parent type of GTK application window, we have to use still GTK application window in the procedure signature, otherwise the compiler would complain about incompatible types. This is a limitation of current gintro bindings, and it stems from the fact that the connect macro simply enforces type matching without investing the actual types of the provided callback function and checking for type compatibility. If we have to use a plain GTK window type for the second parameter of the destroyWindow() callback for some reason, then we can make it work again with a type conversion like button.connect("clicked", destroyWindow, gtk4.Window(window)).
We can compile and run our Nim program with the following commands from a terminal window:
nim c hello_world.nim
./hello_world
The above compiler invocation builds the executable in default debug mode with a lot of runtime checks enabled and without enabled optimizations for the C compiler back end, so the executable size is large and the program would not run very fast. Generally, we compile our Nim programs with the option -d:release to restrict checks to the most important ones and to enable back end optimizations after we have tested our program well in debug mode. That results in a smaller and faster executable. We can further reduce the executable size by compiling our Nim program with the new Nim ARC memory management and by enabling link time optimization for the C compiler back end:
nim c -d:release --gc:arc -d:useMalloc --passC:-flto hello_world.nim
Here we additional use -d:useMalloc to use plain malloc() instead of Nim’s own memory allocation. That command gives us an executable size of about 40 kByte with gcc 10 back end, which is still larger than the C executable, but not that much. We could disable all checks by specifying -d:danger instead of -d:release to further decrease the executable size. Note that with the above options, our program is compiled for optimal performance. If executable size is more important than performance, we could try other compiler options like --opt:size, but that makes little sense for GUI desktop applications.
Nim API Docs
Unfortunately, it is nearly impossible to provide a full set of commented API docs for the gintro Nim GTK bindings. The GTK-related modules consist of more than 10,000 functions and about 2,000 data types, constants, and enums. It is planned to list them all on some HTML pages, but that would provide only the symbol names and the signature for procedures. Copying the C comments verbatim would not make much sense, and rewriting all comments for Nim would be a gigantic effort. Generally, the best solution for Nim is to follow the C API docs, which are generated by GTK directly from the GTK C source code. The C API docs are, in most cases, of good quality and not outdated, and the differences to the Nim API are generally obvious. For example, if you are interested in using GTK buttons, you can enter "GtkButton", "GTKButton gtk4" or "GTKButton API" into the search field of an internet search engine, and you should get the matching GTK API page like https://developer.gnome.org/gtk4/stable/GtkButton.html. You may also consider installing the GTK devhelp tool, which provides the GTK C API without generating Internet traffic.
For stubborn cases, it may be useful to use the Linux grep tool from the terminal window. Let us assume that you want to create a new button widget with a label, and you know that for C https://developer.gnome.org/gtk4/stable/GtkButton.html#gtk-button-new-with-label is used for that. So maybe you tried from Nim let button = newButtonWithLabel("Run program") but the Nim compiler tells you that this function is not available. Well, the problem is obvious — Nim supports function overloading, so we have newButton(): Button and newButton(label: string): Button. But sometimes we are just too tired. We know the name of the C function, so let us use that as a starting point:
grep -C3 gtk_button_new_with_l ~/.nimble/pkgs/gintro-#head/gintro/*
...
proc gtk_button_new_with_label(label: cstring): ptr Button00 {.importc, libprag.}

proc newButton*(label: cstring): Button =
  let gobj = gtk_button_new_with_label(label)
  let qdata = g_object_get_qdata(gobj, Quark)
...
The gintro generated modules are generally located in ~/.nimble/pkgs/gintro-#head/gintro/ and contain clean and ordered code. Data types and methods working on these types are grouped together. Let us assume that you want to create a new GTK application but are not sure which flags are available. Two grep calls should give us all the information we need:
grep -C3 gtk_application_new ~/.nimble/pkgs/gintro-#head/gintro/gtk4.nim
...
proc gtk_application_new(applicationId: cstring; flags: gio.ApplicationFlags): ptr Application00 {.
    importc, libprag.}

proc newApplication*(applicationId: cstring = ""; flags: gio.ApplicationFlags = {}): Application =
  let gobj = gtk_application_new(safeStringToCString(applicationId), flags)
  let qdata = g_object_get_qdata(gobj, Quark)
  if qdata != nil:
...
grep -B12 "ApplicationFlags\*" ~/.nimble/pkgs/gintro-#head/gintro/gio.nim
type
  ApplicationFlag* {.size: sizeof(cint), pure.} = enum
    isService = 0
    isLauncher = 1
    handlesOpen = 2
    handlesCommandLine = 3
    sendEnvironment = 4
    nonUnique = 5
    canOverrideAppId = 6
    allowReplacement = 7
    replace = 8

  ApplicationFlags* {.size: sizeof(cint).} = set[ApplicationFlag]
For the second grep call, we took advantage of the fact that the flags are exported, so an export marker must follow the name. We had to put quotes around the search string and to escape the asterisk.
GtkApplication and the Application Program Style
For GTK 3 and GTK 4 programs, we generally use the application program style. In this style, we use a small, arbitrary-named main procedure that creates our application by calling newApplication(), then connect the application to a set of callback procedures with application-specific signals, and finally calls run() to run the GTK main loop. All further program execution is now guided by GTK signals, which cause the execution of our callback functions. The GtkApplication class is a subclass of GApplication of module gio and supports signals like "startup", "activate", "open", "shutdown" and some more.
Understanding the GtkApplication class is probably the most demanding task for new GTK programmers. Indeed, it is not easy to understand the whole GtkApplication API; the API documentation is extensive, and information is distributed over many places:
Some beginners fear the application style and fall back to the old GTK 2 shape of programming with its gtk.init() and gtk.main() calls. But the application style offers a lot of benefits, including the new look with hamburger menus and the GTK menubar, the GActions, which decouple user actions from concrete input sources like keyboard or mouse, the automatic handling of program parameters and arguments, and the handling of single or multiple windows or program instances.
For the beginning, you can ignore most of the signals of the GTKApplication class and connect your activate() procedure only to the activate signal of the GtkApliclation class, as we did in our previous examples. Later, you can add more signals and distribute your whole startup code across multiple callback procedures.
The most important GtkApplication signals are:
- startup
-
set up and initialize the application
- activate
-
program launch without file arguments, so open a default initial window
- open
-
launch with file arguments, display file content
- shutdown
-
do cleanup work, closing files, or saving documents
When our application program starts, then the startup signal is emitted. We can connect a startup callback procedure to this signal that can perform some initialization tasks that are not directly related to showing a new window. When our program is invoked without file parameters, then the activate signal is emitted next, and our activate callback procedure may open an empty window for the user. In the case that the user passes some file parameters, the open signal is emitted instead of the activate signal, and we have to open the specified files. Generally, GTK applications use only a single program instance. If the user attempts to start a second instance of a single-instance application, then GtkApplication will send signals to the already running first instance, and we will receive additional activate or open signals. In this case, the second instance will exit immediately, without calling startup or shutdown. Our application programs generally terminate when we close all open windows, but we can use the function g_application_hold() to prevent the termination of our program. When our program finally terminates, we get the shutdown signal, and our connected shutdown callback function can do some cleanup work or maybe save all open files.
Primary and Remote Instances
One important decision we have to make when we write a program is how the program should behave when we start it with and without arguments and when we start it multiple times. The most basic solution would be to open a separate window for each passed file argument, and to open more distinct windows when the program is started multiple times. But that is not always what the user may expect: For a text editor or image processing program, the user may desire only one large window that is divided into multiple areas for each passed file, or maybe some sort of stacked display. And when a new program instance is launched, the user may expect that the provided file arguments are passed to the already running program instance. The GtkApplication class can handle all this for us.
When we start our application, then the first program instance is called the primary instance. When we launch the program again, that program instance is called a remote instance. GTK uses the term "local instance" to refer to the current process, which can be the primary instance or a remote one.
Signals are always emitted in the primary instance only. For remote instances, messages are sent to the primary instance, and signals are then emitted in the primary instance.
Dealing with the Command Line
Normally, GtkApplication programs will assume that arguments passed on the command line are files to be opened. If files were provided, our GtkApplication program will receive them in the form of GFile objects from the open signal. If no arguments are passed, then the activate signal is emitted, and the activate callback procedure may open its main window with an empty document.
The GtkApplication class also supports more advanced command.line handling like the processing of --help, --version, and other program options. We will not discuss these advanced options here; you may consult the API documentation for details:
Minimal Application Example
The following code example is the skeleton of a text editor program. We use the signals startup, activate, open, and shutdown. We also define callback procedures for some of the other signals available for the GtkApplication class to show their shape, but they are not really active. Our program shall open an empty text window when launched with no argument and open a text file when a file argument is available. When we call the program again with a file argument, then the existing text window is reused for the new text file. As GTK 4 may not yet support the GtkSourceView widget, we have used a plain GtkTextView for displaying the text. That widget is embedded in a GtkScrolledWindow to provide scrollbars and scrolling functionality. With some minimal changes, you can also use the code below for GTK 3: Replace setChild() with add() calls, and show() with showAll(). For GTK 3, you can also replace the TextView widget type with SourceView and then use the advanced functionality of the gtksource module to support stuff like syntax highlighting for program files.
As before, our main() procedure creates the application, connects the callback procedures to signals, and runs the application program. As we want to support the open signal, we have to pass the command line parameters to the run() procedure. As Nim does not give us direct access to the command line argument string array, we have to construct it by querying paramStr() for each argument. Note that we pass the flag ApplicationFlag.handlesOpen to the newApplication() call to tell GTK that it should not ignore file arguments. To keep the example short, we made the activate procedure dumb. /(It creates a textview, a scrolled widget and the main window and inserts the It generates a textview, a scrolled widget, and the main window, then inserts them into one another. A smarter activate() procedure should try to detect an already existing window of an already running primary program instance as it does the open() callback. The open() callback procedure uses app.getActiveWindow() to check if a primary instance of our program is already running and reuses that window if possible. Otherwise, it creates new widgets in the same way as the activate() procedure does. Then it calls loadContents() to load the textual content from the provided GFile into a string and sets that text as the buffer content of the textview widget.
Note that this is only a minimal skeleton. For a real text editor program, we would have to do much more checks, and we may want to handle multiple file arguments. We will learn in later sections of this book how we can do that and which widgets support the display of multiple texts.
# nim c textview.nim
# ./textview textview.nim
# minimal GtkApplication example
import gintro/[gtk4, gobject, glib, gio] # , gtksource] # gtksource is not yet available for GTK4

from OS import paramCount, paramStr

proc shutdown(app: Application) =
  echo "shutdown"

proc startup(app: Application) =
  echo "startup"

proc handleLocalOptions(app: Application; vd: VariantDict): int =
  echo "handle-local-options"

proc nameLost(app: Application): bool =
  echo "name-lost"

proc open(app: Application; files: seq[GFile]; hint: string) =
  var
    contents: string
    etagOut: string
    length: uint64
    buffer: TextBuffer
    window: gtk4.Window
    view: gtk4.TextView
  echo "open"
  for f in files:
    echo f.uri
  window = app.getActiveWindow
  if window != nil: # instead of opening a new window reuse existing one
    let h = ScrolledWindow(window.getChild)
    view = TextView(h.getChild)
  else:
    window = newApplicationWindow(app)
    window.title = "Text View"
    window.defaultSize = (800, 600)
    let scrolledWindow = newScrolledWindow()
    view = newTextView() # gtksource.newView()
    window.setChild(scrolledWindow) # add() for GTK3
    scrolledWindow.setChild(view) # add() for GTK3
  if files.len > 0:
    if loadContents(files[0], cancellable = nil, contents, length, etagOut):
      assert length.int == contents.len
      echo "hint: ", hint
      echo "etag: ", etagOut
      buffer = view.getBuffer
      buffer.setText(contents, contents.len)

  show(window) # showAll() for GTK3

proc commandLine(app: Application; cl: ApplicationCommandLine): int =
  echo "command-line"

proc activate(app: Application) =
  echo "activate"
  let window = newApplicationWindow(app)
  window.title = "Empty Text View"
  window.defaultSize = (800, 600)
  let scrolledWindow = newScrolledWindow()
  let view = newTextView() # gtksource.newView()
  window.setChild(scrolledWindow) # add() for GTK3
  scrolledWindow.setChild(view)
  show(window) # showAll() for GTK3

proc main =
  let app = newApplication("org.gtk.example", {ApplicationFlag.handlesOpen})#, handlesCommandLine})
  app.connect("startup", startup)
  app.connect("activate", activate)
  app.connect("command-line", commandLine)
  # app.connect("handle_local_options", handleLocalOptions)
  app.connect("open", open)
  app.connect("name-lost", nameLost)
  app.connect("shutdown", shutdown)
  let argLen = paramCount() + 1
  var argStr = newSeq[string](argLen)
  for i in 0 ..< argLen:
    argStr[i] = paramStr(i)
  discard run(app, argLen, argStr) # we have to pass an argString to support open signal handling files

main()
You can launch that program with or without a file argument, and launch it again with a different file argument to replace the text shown in the textview widget.
nim c textview.nim
./textview &
./textview textview.nim
./textview anothertext.txt
We do not provide a picture for this program as it is not very interesting; it is only a window with some textual content and some optional scrollbars at the right and at the bottom of the window.
Basic Widgets
In this chapter, we will present some simple widgets that are useful and easy to understand and use. We have already used the toplevel widgets GtkWindow and GtkApplicationWindow that build generally the outer rectangular container for our whole graphical user interface. Windows normally have a title and decorations that are under the control of the windowing system and allow the user to manipulate the window (resize it, move it, close it,etc.). In GTK 3 and GTK 4, windows can have only one single child, but this child can be a container widget, which can hold many widgets, including more container widgets. So all the widgets are arranged in a hierarchical fashion, starting with the top-level window widget.
GtkBox
Let us assume that we want to create some sort of buying app that, in its simplest form, may contain a text entry field where we can type in what we want to buy and a button to order that article. And we may want to have a textual label beside our text entry field. So a sketch of our widget arrangement may look like this:
 label entry

   button
The label and the text entry should be arranged horizontally beside each other, and centered below these two widgets there should be the buy button. GTK offers various container widgets to create such a layout. We will start with the GtkBox container, which can arrange widgets horizontally beside each other or vertically below each other. For the label and the entry, we create a horizontal box and insert these widgets in that box. Then we create another vertical box in which we first insert the first box and then the button. And we are done.
  -----------------
 |                 |
 |  -------------  |
 | | label entry | |
 |  -------------  |
 |                 |
 |      button     |
  -----------------

##  nim c --gc:arc basicWidgets1.nim

import gintro/[gtk4, gobject, gio]
import std/with

proc buttonCB(button: Button; entry: Entry) =
  let input = entry.text
  if input.len == 0:
    echo "Ordered a big bag of nothing!"
  else:
    echo "Ordered some ", input
    entry.setText("") # clear entry for new input
    discard entry.grabFocus # let keyboard input go again to this entry widget

proc activate(app: gtk4.Application) =
  let window = newApplicationWindow(app)
  let vbox = newBox(Orientation.vertical, 25) # outer box
  let hbox = newBox(Orientation.horizontal, 25) # inner box above button
  let label = newLabel("Food:")
  let entry = newEntry()
  entry.widthChars = 32 # widthChars function is from GtkEditable interface
  let button = newButton("Buy it now!")
  hbox.append(label)
  hbox.append(entry)
  vbox.append(hbox)
  vbox.append(button)
  button.connect("clicked", buttonCB, entry)
  with vbox:
    setMarginStart(25)
    setMarginEnd(25)
    marginTop = 10 # with a recent Nim compiler assignment inside with block works also
    marginBottom = 10
  with window:
    setChild(vbox)
    title = "Mississippi App"
    defaultSize = (400, 100)
    # show # works
  window.show # but this is more clear

proc main =
  let app = newApplication("org.gtk.example")
  app.connect("activate", activate)
  let status = app.run
  quit(status)

main()
The basic shape of the above program is again similar to our first hello_world.nim example: We have a main() procedure that creates our application, connects it to the activate callback procedure, and finally runs the app. The activate callback creates all of our widgets and inserts them in a hierarchical way into the container widgets. The button widget is connected to a callback procedure that gets the entry widget as an additional parameter, so that this procedure can access our textual input by calling getText(entry), which is equivalent to entry.text with method call syntax and without the optional get prefix for the procedure name. In the code above, we use the new "with" macro introduced in Nim version 1.2, which saves us from typing the widget names many times.
The box containers are created with a call of newBox(), which needs an Orientation enum parameter and an integer parameter specifying the spacing between the widgets in the container in logical pixels. We insert our child widgets into the GtkBox container using the append() procedure. We could have also used prepend(). To learn more about the GtkBox class, you may visit
or invoke the devhelp tool.
The GtkLabel is a plain, mostly passive widget that is used to display some textual descriptions. It offers many functions to modify its appearance or change the textual content; for more information, you may consult
The GtkEntry widget is used for entering single lines of text. GtkEntry offers a large set of functions and properties to modify its appearance. We can set the maximum number of characters, make the text invisible for password queries, or set the alignment of the text when the text is smaller than the widget size. The widgets allow simple editing with keys like left, right, and backspace; you can click on individual characters with the mouse to modify the insert position, or you can use the default popup menu when you press the right mouse button when the mouse pointer hovers above that widget. You can also connect to the "activate" signal of the GtkWidget to activate a callback procedure when the user presses the enter key to confirm his textual input.
For more information, see
One special property of the GtkEntry widget is the fact that it implements the GtkEditable interface, see
So all the functions of GtkEditable can be used on GtkEntry widgets as well. We use in our example above the function setWidthChars() in the form entry.widthChars = 32 to give it the right size to show up to 32 characters — you can type in longer text, it scrolls.
Don’t forget that all these widgets are children of the parent GtkWidget class, so you can use all the GtkWidget functions also. /(We use grabFocus() in the buttonCB() In the buttonCB() procedure, we use grabFocus() to allow keyboard input to flow continuously to this widget, eliminating the need for the user to click the mouse pointer into the entry widget before it accepts keyboard input again.
The notify signal
We said that each GTK widget provides a set of signals, which we can use to catch user actions like pressing a button or entering some text when we connect a handler (callback) procedure to the named signal. For example, a button provides the "clicked" signal, and a text entry widget provides the "activate" signal, which is emitted when the user has entered some text and terminates the input by pressing the ENTER or RETURN key. Most widgets have also a set of properties (attributes). Whenever a property of a widget is changed then the "notify" signal is emitted. When we connect to this "notify" signal, then we get informed whenever one of the widget properties is changed. In the callback handler, we can use the function paramSpec.getName() to get the actual name of the changed property. Typically, we are only interested in changes of a single property. In that case, we can use a so-called detailed "notify" signal of the form "notify::detail". In the following example, we will use an entry widget, and connect to the "notify::cursor-position" signal. The entry widget implements the editable interface, and this interface provides a set of properties, including the "cursor-position" property. We connect our notify() callback to the detailed signal "notify::cursor-position". When the cursor position in the entry changes, because the user types in new characters or moves the cursor, our callback is called. Notify callbacks have as their second parameter an instance of type ParamSpec. This data type is not used that often — in a notify callback, we may use the getName() function on the parameter to get the name of the changed property. This may be needed when we connect to the plain "notify" signal and have to decide which property was actually changed. We will learn some more details about the GtkEntry widget in a later section, and we will use the notify signal for a more useful property later in the book, when we introduce the GtkDropDown list widget.
import gintro/[gtk4, gobject, gio, glib]

proc activate(e: Entry) =
  echo "You entered: ", e.buffer.text

proc notify(e: Entry; paramSpec: ParamSpec) =
  echo "notify:", paramSpec.getName
  echo e.getPosition

proc activate(app: gtk4.Application) =
  let window = newApplicationWindow(app)
  let entry = newEntry()
  entry.connect("activate", activate)
  # entry.connect("notify", notify) # this would give us a lot of notifications
  entry.connect("notify::cursor-position", notify)
  window.setChild(entry)
  window.present

proc main =
  let app = newApplication("org.gtk.example")
  app.connect("activate", activate)
  discard app.run

main()
GtkGrid
The GtkGrid is a container widget that is used to arrange child widgets in a rectangular shape like a table or a matrix. In GTK 3, a similar container called GtkTable was available, but GtkTable is now deprecated. We create a new grid widget with the newGrid() constructor, and we insert arbitrary other widgets by using the attach() procedure. As parameters of attach(), we pass the child widget, the column and row coordinates where we want to insert the child, and optionally a width and height if that child should span more than one single cell. The GtkGrid also accepts negative position coordinates, which is useful when we have already created a grid with coordinates starting at zero and then want to add a header label at the top or other widgets at the left. We do not have to modify our existing code, we can just use negative coordinates for our forgotten stuff. GtkGrid offers some more functions, for example to set the spacing between children or to remove attached widgets again, see
The following example creates a plain employee status table. We use GtkCheckButtons as child widgets, which are widgets that use a visible check mark to indicate a boolean state. In the example, we use a label widget spanning all columns to display a headline, and at the left, a label widget for each employee to display the name. We connect each CheckButton widget to a toggled() callback procedure using the "toggled" signal. The GtkCheckButton is a child of the GtkToggleButton, which provides the "toggled" signal. We use two distinct callback functions for this signal so that we can differentiate between vacation and retirement statuses. But still, we need the name of the employee in the callback procedure to display the new status. We have different ways to enable this: we could sub-type our CheckButton class to store additional information, or we could pass an optional parameter when we connect to the toggled callback. We will explain sub-typing in later sections when we have to store additional information in our widgets. For now, we can also use the fact that we can give widgets names using the setName() function. So we can just attach the name of the employee directly to the widget. To make the code below not too verbose, we have not cared much about the visual appearance. For a real application, we would care more about alignment, justification, and separation of the various widgets, and maybe style some labels using CSS or Pango text attributes. We will learn how to do that in later sections.
##  nim c --gc:arc grid.nim
import gintro/[gtk4, gobject, gio]
import strutils

proc toggledVacCB(b: CheckButton) =
  echo "Vacation state: ", b.name, if b.active: " Yes" else: " No"

proc toggledRetCB(b: CheckButton) =
  echo "Retirement state: ", b.name, if b.active: " Yes" else: " No"

proc activate(app: gtk4.Application) =
  let window = newApplicationWindow(app)
  let grid = newGrid()
  let head = newLabel("Available Devs")
  let name = newLabel("Name")
  let vacation = newlabel("Vacation")
  let retired = newLabel("Retired")
  window.defaultSize = (40, 60)
  grid.columnSpacing = 25
  grid.attach(head, column = 0, row = -2, width = 3, height = 1)
  grid.attach(name, 0, -1)
  grid.attach(vacation, 1, -1)
  grid.attach(retired, 2, -1)
  for i, p in pairs("araq mratsim bassi clasen".split):
    let lab = newLabel(p)
    let vac = gtk4.newCheckButton("Vac.")
    vac.setName(p)
    vac.connect("toggled", toggledVacCB)
    let ret = gtk4.newCheckButton("Ret.")
    ret.setName(p)
    ret.connect("toggled", toggledRetCB)
    grid.attach(lab, column = 0, row = i)
    grid.attach(vac, column = 1, row = i)
    grid.attach(ret, column = 2, row = i)
  window.setChild(grid)
  window.show

proc main =
  let app = newApplication("org.gtk.example")
  app.connect("activate", activate)
  let status = app.run
  quit(status)

main()
The main() procedure is again identical to the ones in our previous examples. In the activate procedure, we create the window, the grid, some labels, and a few check buttons. We use the overloaded function of newCheckButton(), which accepts a string that is displayed on the right of the check box. The C name for that function is gtk_check_button_new_with_label(). We attach the header label at column 0 and row -2 at the top of our grid and let it extend over 3 columns by specifying width = 3. Next, we set column headings for all 3 columns by attaching labels. It follows a loop where we iterate over all our employees, create a label widget with the name of the employee, and two status widgets for vacation and retirement states, and attach them to the grid. Finally, we set the grid as a child of our window and show() the window with all its child widgets. We have connected our ToggleButton widgets to two distinct callbacks for vacation and retirement states. When we click with the mouse on a check box to toggle the current state, then our callback functions print the new state to the terminal window. The callback retrieves the name of the employee from the widget by calling getName() on the widget and the new state by calling getAcctive() — we used method call syntax and left out the get prefix here. In the code above, we set the default window size to a really small value, so the window extends automatically to the required size to contain the grid with all its child widgets. This ensures that the top-level window has no unused void areas. And we use setColumnSpacing() to separate the columns of the grid horizontally. Note that we use named parameters for the first attach() call when we attach the head widget. For the later attach() calls, we use positional arguments and use the default 1 for width and height value. For more info about the GtkCheckButton see
GAction
Before we continue with more widgets, we will introduce you to the concept of actions.
In the previous example programs, we connected widgets directly to our callback functions using the connect() macro call. This is easy but not very flexible. Perhaps we want the user to be able to call the same callback function from a popup menu item or a keyboard shortcut?
The concept of actions avoids a tight coupling of functionality to actual GUI elements. Actions are a way to tell the GTK toolkit about a piece of functionality in our program and to give it a name. We can map those actions to GUI elements like widgets, popup menu items, or keyboard key sequences to give the user access to that functionality. The connection to the GUI elements can occur directly in our program code, or we may do the connections through XML files.
The GTK 3 library had its own action type called GtkAction, which has been deprecated since version 3.10 and should not be used any more. Instead, we use the GAction class, which is provided by the GIO library and is used for GTK 3 and GTK 4. GAction is generally used together with the GtkApplication class, which we introduced earlier.
Indeed, GAction is merely the interface to the concept of an action. Various implementations of GActions exist, including GSimpleAction, which we will use in the following examples. Another important implementation of GAction is GPropertyAction, which can be used to control the properties of GObjects.
An action has four pieces of information associated with it:
-
a name as an identifier (usually an all-lowercase, untranslated English string)
-
an enabled flag indicating if the action can be activated or not
-
an optional state value for stateful actions
-
an optional parameter type, used when activating the action
An action supports two operations:
-
activation, invoked with an optional parameter
-
state change request for stateful actions, invoked with the new requested state value
Most actions in our GTK {apps} will be stateless actions with no parameters. These actions can be represented by plain menu items without special decoration, like a "quit", "print" or "new document" menu item.
Stateful actions can have a plain boolean state like on/off or yes/no or a state with multiple possibilities like left/center/right for text justification in an editor.
Stateful actions with a boolean state are used when the actions should modify the state of the whole app, or of a window like "display line numbers" in a text editor or "fullscreen" for a window. This type of action is called a toggle action as it toggles the boolean state (true/false). Toggle actions use no parameters, the activation always toggles the state. In menu items, the "true" state is represented by a visible check mark.
If the state of a stateful action cannot be represented by a boolean state, then an enumeration of the possible values is used as a state indicator, typically as a string like left/center/right for text justification. These actions are also called radio actions and are represented by radio buttons or radio menu items. These actions have a parameter type equal to their state type, and activating them with a particular parameter value changes the state to that value.
Actions can be bound or scoped to the whole app, or to single windows. For example, the "fullscreen" action or "save" and "print" actions for windows containing a document impact only a single window, while actions like "about" or "preferences" impact the whole application. Actions scoped to single window instances allows each window to have its own state independently from the other window instances. We use the function addAction() with a window as the first parameter to add an action to a window instance or with our GtkApplication as first parameter to add the action to the whole application.
To specify the scope when we map the action to widgets, menu items, or keyboard keys, we have to prefix the action name with the prefix "win." for window bound actions and with "app." for actions bound to the whole app.
References:
A tiny GAction Example
The use of GAction seems complicated, and so some people still avoid it. But it is flexible and currently the best supported way to create interactions with the user, so we will use it in the rest of this book. We will start with a very simple application with only a single action (save), which we map to a button widget and at the same time to a key sequence (control shift s). That example is similar to a Python code listing from https://developer.gnome.org/GAction/. In the next section, we will then create a larger app with an overlay menu based on a C example provided by the GTK developers (testgaction.c).
C code usually uses the function g_action_map_add_action_entries() with an array of GActionEntry structs as a parameter to create the desired action, like
 static GActionEntry app_entries[] =
{
  { "preferences", preferences_activated, NULL, NULL, NULL },
  { "quit", quit_activated, NULL, NULL, NULL }
};

static void
example_app_startup (GApplication *app)
{
  ...
  g_action_map_add_action_entries (G_ACTION_MAP (app),
                                   app_entries, G_N_ELEMENTS (app_entries),
                                   app);
  ...
}
This is comfortable but not really type safe and is not available in Nim. In Nim, we use the function newSimpleAction() to create stateless actions and then use the connect() macro to connect that action to a callback function. The callback function receives the action and a variable of type GVariant as parameters and can accept one more arbitrary optional parameter. The GVariant parameter would contain the actual state for stateful actions; for stateless actions, it is generally ignored. After we have created the action, we connect it with the addAction() function to the ActionMap of our GTK window. The GtkApplicationWindow provides an interface to GActionMap, but as the interface itself and the interface provider are defined in different modules (GIO vs. GTK), we have to convert the ApplicationWindow to ActionMap with a call of actionMap(window) before we can add the action. Finally, we call the functions setActionName() and setAccelsForAction() to map the save action to our MenuButton and a keyboard key sequence, respectively. We prefix the action name with "win." to indicate that the action is bound to the current active window.
# nim c --gc:arc gaction0.nim
import gintro/[gtk4, glib, gobject, gio]

proc saveCb(action: SimpleAction; v: Variant) =
  echo "saveCb"

proc appActivate(app: Application) =
  let window = newApplicationWindow(app)
  let action = newSimpleAction("save")
  discard action.connect("activate", saveCB)
  window.actionMap.addAction(action)
  let button = newButton()
  button.label = "Save"
  window.setChild(button)
  button.setActionName("win.save")
  setAccelsForAction(app, "win.save", "<Control><Shift>S")
  show(window)

proc main =
  let app = newApplication("org.gtk.example")
  connect(app, "activate", appActivate)
  discard run(app)

main()
Our save callback function contains only an echo statement, which writes a message to the terminal window when the action is activated. In a real application, that function would save the content of the currently active window.
In the example code above, we used actions bound to single window instances. We added our action to the action map of our window, and we used the prefix "win." when we mapped the action to a button widget and to a keystroke sequence. We can easily modify the code to bind the action to the whole app: We call the addAction() function on the GtkApplication instance and use the "app." prefix for the action name when we map it to the button widget and to the key sequence:
app.addAction(action)
...
  button.setActionName("app.save")
  setAccelsForAction(app, "app.save", "<Control><Shift>S")
For stateless actions, it does not really matter if we use actions scoped to single window instances or to the whole app, but for stateful actions, it can make a difference: Only actions bound to window instances can have checkmarks or radio buttons that differ for each window. Note that when we create the action with the newSimpleAction() call, we use the action name without a prefix, but for the setActionName() call as well as for the setAccelsForAction() call, a prefix is necessary, and it has to exactly match the action scope: We select a global scope by calling addAction() on the app instance and have to use "app." prefixes then. Or we call addAction() on a window instance and have to use the "win." prefix. If the prefix does not match the action scope, or if no prefix is used, keyboard shortcuts will not work, and buttons or menu items will be greyed out and will not work.
GAction and GMenu
Our next example program creates a popup menu bound to a menu button. We map a set of actions to the items of our menu. This includes simple stateless actions, a toggle action with a boolean state, and a stateful action with three states numbered 1, 2, and 3. The menu items display a checkmark for the toggle action when enabled, and the stateful action with the three states is displayed with the corresponding radio menu items. The example is based on a C language GAction example called testgaction.c found in the GTK4 tests directory.
import gintro/[gtk4, glib, gobject, gio]

const menuData = """
  <interface>
    <menu id="menuModel">
      <section>
        <item>
          <attribute name="label">Normal Menu Item</attribute>
          <attribute name="action">win.normal-menu-item</attribute>
        </item>
        <submenu>
          <attribute name="label">Submenu</attribute>
          <item>
            <attribute name="label">Submenu Item</attribute>
            <attribute name="action">win.submenu-item</attribute>
          </item>
        </submenu>
        <item>
          <attribute name="label">Toggle Menu Item</attribute>
          <attribute name="action">win.toggle-menu-item</attribute>
        </item>
      </section>
      <section>
        <item>
          <attribute name="label">Radio 1</attribute>
          <attribute name="action">win.radio</attribute>
          <attribute name="target">1</attribute>
        </item>
        <item>
          <attribute name="label">Radio 2</attribute>
          <attribute name="action">win.radio</attribute>
          <attribute name="target">2</attribute>
        </item>
        <item>
          <attribute name="label">Radio 3</attribute>
          <attribute name="action">win.radio</attribute>
          <attribute name="target">3</attribute>
        </item>
      </section>
    </menu>
  </interface>"""

proc changeLabelButton(action: gio.SimpleAction; parameter: glib.Variant; label: Label) =
  label.setLabel("Text set from button")

proc normalMenuItem(action: gio.SimpleAction; parameter: glib.Variant; label: Label) =
  label.setLabel("Text set from normal menu item")

proc toggleMenuItem(action: gio.SimpleAction; parameter: glib.Variant; label: Label) =
  let newState = newVariantBoolean(not action.getState.getBoolean)
  action.changeState(newState)
  label.setLabel("Text set from toggle menu item. Toggle state: " & $newState.getBoolean)

proc submenuItem(action: gio.SimpleAction; parameter: glib.Variant; label: Label) =
  label.setlabel("Text set from submenu item")

proc radio(action: gio.SimpleAction; parameter: glib.Variant; label: Label) =
  var l: uint64
  let newState: glib.Variant = newVariantString(parameter.getString(l))
  action.changeState(parameter)
  let str: string = "From Radio menu item " & getString(newState, l)
  label.setLabel(str)

proc activate(app: gtk4.Application) =
  let
    window = newApplicationWindow(app)
    box = newBox(gtk4.Orientation.vertical, 12)
    menubutton = newMenuButton()
    button1 = newButton("Change Label Text")
    actionGroup: gio.SimpleActionGroup = newSimpleActionGroup()
    label: Label = newLabel("Initial Text")

  var action: SimpleAction
  action = newSimpleAction("change-label-button")
  discard action.connect("activate", changeLabelButton, label)
  actionGroup.addAction(action)

  action = newSimpleAction("normal-menu-item")
  discard action.connect("activate", normalMenuItem, label)
  actionGroup.addAction(action)

  var v = newVariantBoolean(true)
  action = newSimpleActionStateful("toggle-menu-item", nil, v)
  discard action.connect("activate", toggleMenuItem, label)
  actionGroup.addAction(action)

  action = newSimpleAction("submenu-item")
  discard action.connect("activate", submenuItem, label)
  actionGroup.addAction(action)

  v = newVariantString("1")
  let vt = newVariantType("s")
  action = newSimpleActionStateful("radio", vt, v)
  discard action.connect("activate", radio, label)
  actionGroup.addAction(action)
  window.insertActionGroup("win", actionGroup)

  label.setMarginTop(12)
  label.setMarginBottom(12)
  box.append(label)
  menuButton.setHalign(gtk4.Align.center)

  var builder = newBuilderFromString(menuData)
  var menuModel: gio.MenuModel = builder.getMenuModel("menuModel")
  var menu = newPopoverMenuFromModel(menuModel)
  menuButton.setPopover(menu)
  box.append(menubutton)
  button1.setHalign(gtk4.Align.center)
  button1.setActionName("win.change-label-button")
  box.append(button1)
  window.setChild(box)
  window.show

proc main =
  let app = newApplication("org.gtk.example")
  app.connect("activate", activate)
  let status = app.run
  quit(status)

main()
When you run this example program, you will get a window with a label displaying a textual message, a plain button widget that updates the label message when you click the button, and a menu button that displays a popup menu when you click it. Each menu item also allows you to update the label message.
For this example, we use an XML string constant to construct our menu. The GTK developers generally recommend using XML files for the description of the GUI layout whenever possible. We noticed already earlier in this book that the advantages of XML files are not always obvious when using high-level languages like Nim. But for menu construction, XML files are indeed helpful, and as the C code on which this example is based also uses XML for the menu, we do the same. In the next section, we then construct the same menu without XML directly with elementary GTK function calls. One disadvantage of XML files is that they are plain multi line text strings, so the C or Nim compiler can not validate them in advance. We have to run the code to see if everything is correct, or maybe use other validating tools for the XML. Or we may try to create the XML string with tools like Glade from the beginning. For now, we just take the XML menu string directly from the provided testgaction.c example program. That string has the well-known shape of ordinary XML files. For processing and accessing XML GUI definitions, GTK provides the GtkBuilder library. We call newBuilderFromString() with our XML string as argument to open the XML file, and them builder.getMenuModel() to access the whole menu construct. As an argument of getMenuModel() we pass an id string, which we had defined inside our XML string constant as <menu id="menuModel">. Finally, we map that menuModel to a GTK menu button by calling setPopover(). The XML menu definition is divided into multiple sections, each of which contains one or more item definitions. Each item has two attributes: label and action. The attribute label specifies the string that is displayed as menu item text, and the attribute action is the name of a GAction that we define in our program. We prefix the action name with "win." to indicate that it is scoped to the current window. For the radio item entries, we use an additional attribute called target that specifies the actual argument, which is passed to the action callback function when the action is activated. And finally, one item of our menu is enclosed in a submenu section to create a submenu.
In the activate() procedure, we create all our desired actions and connect them to callback functions in a way similar to how we did it in the previous example. One difference is that we add the created actions not directly to the application or to the application window, but we create an ActionGroup by calling newSimpleActionGroup() first, add all the actions to that group, and finally call the statement window.insertActionGroup("win", actionGroup) to add the group with all our actions to our application window. Grouping actions in this way can have some advantages, e.g., we can easily deactivate or remove an action group from a window or from the whole app.
In addition to some stateless simple actions, which we create again with a call of newSimpleAction(), this example uses actions with states. We use a call of newSimpleActionStateful("toggle-menu-item", nil, v) to create a toggle action with a boolean state. We have to pass the initial boolean state to this call via a GVariant data type, which we create with a call to newVariantBoolean(). The reason that we cannot just pass the actual boolean value directly to that procedure but have to use a GVariant is, that C and Nim are both typed languages, which means that all three parameters of proc newSimpleActionStateful() must have a well-defined data type, which is GVariant for the last parameter. A Variant is a special container type, which has a well-defined data type but can wrap other data types. Don’t confuse the GVariant that we use here with Nim’s own variant data type. Both have a similar purpose but are completely different. As Nim supports procedure overloading, we would indeed be free to define our own newSimpleActionStateful() procedure, which accepts a plain bool as the third parameter, and then call the GTK proc with the same name but with a variant type passed as the last parameter. But since this is not yet supported by current gintro bindings, we would have to write the necessary code manually.
For creating our radio actions, some more code is necessary: We use again a call of newSimpleActionStateful() to create the radio actions. But for this type of stateful action, we have to pass the initial state as well as the data type of the state parameter. To pass the parameter type, we must first create a GVariantType variable with newVariantType("s") Here we pass the string "s" as a parameter to indicate that we want a string variant type. You can find the strings that we have to pass for desired types at https://developer.gnome.org/glib/stable/glib-GVariantType.html. For a double type, we would have to pass "d", for example. As the last parameter, we have to pass a GVariant again to specify the initial state. In this case, we create a string variant with the initial state "1" by calling newVariantString("1").
Unfortunately, the requirement for GVariant and GVariantType data types makes our code a little verbose, but the gintro package’s automatically generated bindings do not currently support a simpler method. Maybe later versions will do, but that involves manual work, which of course needs documentation as well. Of course, you can write your own helper procedures. Unfortunately, that can make it harder for others to understand your code, when the reader knows GTK well but not your customization procs. So we leave that out for now.
At the end of this section, we have to discuss the callback functions that we connect with our actions. For the stateless actions it is not very interesting. The parameter list of the callback functions contains a variable of GVariant type, but that variable has no content for stateless actions. For the callbacks connected to the stateful actions, we have more work to do:
proc toggleMenuItem(action: gio.SimpleAction; parameter: glib.Variant; label: Label) =
  let newState = newVariantBoolean(not action.getState.getBoolean)
  action.changeState(newState)
  label.setLabel("Text set from toggle menu item. Toggle state: " & $newState.getBoolean)

proc radio(action: gio.SimpleAction; parameter: glib.Variant; label: Label) =
  var l: uint64
  let newState: glib.Variant = newVariantString(parameter.getString(l))
  action.changeState(parameter)
  let str: string = "From Radio menu item " & getString(newState, l)
  label.setLabel(str)
The most important point is that we have to call action.changeState(newState) to set the new state. Without that call, the state is not updated, and the check mark and the radio buttons would not update their visual appearance. Unfortunately, changeState() needs again a parameter of variant type. For the toggleMenuItem() procedure, the provided variant parameter is not used, as it is a plain boolean toggle action. So we extract the actual state from the action itself, invert the boolean state, and create a new boolean variant of that state, which we pass to the changeState() function. For the radio() callback, it is similar, but the variant parameter already contains the actual new state, which we specified in the menu items in the XML string. We can pass that variant parameter directly to changeState() to change the visual appearance of the radio menu items, or we can extract the actual string from the variant parameter by calling getString() on it to extract the string. We use that string to update our label widget. You may wonder why the getString() procedure has an additional parameter of type uint64. In C, this is an optional out parameter, which is used to retrieve the actual string length.[2] In C, a pointer to a storage location where the library can store the value is passed for such parameters, and GTK allows passing NULL (nil) if the parameter should not be used. The gobject-introspection-generated gintro bindings map such out parameters to Nim’s var parameter, which avoids the ugly and dangerous use of pointers. But unfortunately, the optionality of parameters is lost in the process of conversion to the var type. There is an open issue about this topic in the gintro github issue tracker, but still, there is no good solution. One suggestion was to convert procedures with optional var parameters to functions that return these data as function results, where the function result is a tuple in the case of more than one optional var parameter or in the case that there is already a non-void function result in the C library. But doing that conversion fully automatically is not that easy, and the result may be confusing for the user. So we may create some overloaded functions manually when necessary.
For connecting the actions to our callback functions, we used the "activate" signal, which is provided by the GSimpleAction class. GSimpleAction provides also a "change-state" signal, and we may be tempted to use that one instead for stateful actions. But that signal is a bit problematic, as it may lead to infinite recursion when we call changeState() in our callback functions. As a final note, we should mention that stateful actions can also be used when no callback is actually connected; in this case, GTK calls changeState() directly, and we may query the actual state then from the action variable. But whenever we connect our own callback function, then we have to call changeState() ourselves to update the state.
References:
PopoverMenu
Instead of using a dedicated popup menu bound to a menu button, we can attach popup menus also to other widgets. This may be useful for tools using a GtkDrawingArea or a GtkTextView, where the user may pop up a context menu at the current mouse cursor position. Adding a PopoverMenu to the label widget from our previous example is easy: We reuse the menu data structure and the related procedures. To our previously passive label widget, we add a GestureClick and connect this gesture object to a handler function called pressed(), which pops up the menu at the current mouse pointer position.
GSettings
The GSettings class provides a convenient way to permanently store configuration data and bind it to properties of widgets or other gobject-based data types. The configuration data is described in an XML file, which is then converted into a binary database.
For using GSettings in our own programs, we have first to create an XML file that defines the name and type of each configuration entry, and additional provides a default value, and optionally a summary and a description. The file name of such XML files must always end with ".gschema.xml". The following example has only one field called like-nim of type boolean (b):
<schemalist>
  <schema path="/org/gnome/recipes/"
         id="org.gnome.Recipes">
    <key type="b" name="like-nim">
      <default>false</default>
      <summary>I like Nim</summary>
      <description>
        I like or like not
        the Nim programming language.
      </description>
    </key>
  </schema>
</schemalist>
To use such a configuration, we have to properly install it on our computer. But before we describe that installation process in more detail, let us see how we can use the gsettings configuration in our app. The code below creates a check button and binds its boolean state to the "like-nim" property of the above configuration. When you run the app, you can click on the check button to toggle its state. The new state is automatically stored in the gsettings configuration. If you terminate the app and launch it again, the check button shows its previous state, even after a reboot of your computer.
# gsettings.nim -- basic use of gsettings
# nim c --gc:arc gsettings.nim
# https://blog.gtk.org/2017/05/01/first-steps-with-gsettings/
import gintro/[gtk4, gobject, gio]

# unused
#proc toggle(b: CheckButton) =
#  echo b.active
#  let s = newSettings("org.gnome.Recipes")
#  discard s.setBoolean("like-nim", b.active)

proc activate(app: Application) =
  let window = newApplicationWindow(app)
  window.title = "GSettings"
  window.defaultSize = (200, 200)
  let b = newCheckButton("I like Nim")
  b.halign = Align.center
  #b.connect("toggled", toggle) # we don't need this for plain binding!
  let s = newSettings("org.gnome.Recipes")
  if s.getBoolean("like-nim"):
    echo "I like Nim language"
  `bind`(s, "like-nim", b, "active", {SettingsBindFlag.set, get})
  window.setChild(b)
  show(window)

proc main =
  let app = newApplication("org.gtk.example")
  app.connect("activate", activate)
  let status = app.run
  quit(status)

main()
The above program uses the well-known application style once more. In the activate() procedure, we first create our application window and a new check button. Then we load our gsetting with the newSettings() function, to which we pass the id string "org.gnome.Recipes" which we specified in our XML file. We can query the boolean state of the "like-nim" property with a call to s.getBoolean(). Finally, we bind that property to our check button using the bind() procedure. As bind is a Nim keyword, we have to enclose that procedure name in backticks, which is sometimes also called stropping.[3] The bind procedure requires five arguments — the settings instance, a settings property, a widget, a widget property, and a set with the bind flags. For the settings property, we use the "like-nim" one, which is the only one that is already declared in our XML file. The widget is our check button with its "active" property. Our check button is a subclass of a toggle button, and from https://developer.gnome.org/gtk4/stable/GtkToggleButton.html#GtkToggleButton.properties we know that it has this property, which is mapped to its boolean state and the visibility of its check mark. Finally, we set the set and get flags in the bind flags parameter to bind our check button bidirectionally to that settings property. This simple bind call only works due to the fact that the settings property as well as the check button property have the same data type, boolean in this case. If we want to bind properties with different data types, then we have to use converter procedures, which you may find in the gsettings C API documentation. If the plain binding of a gesettings property to a widget property is not sufficient for a more advanced use case, then you can connect your widget to ordinary signals like the "toggled" signal and matching callback functions that can retrieve and set the gsettings properties directly, as shown in the commented-out toggle() proc in the above code example.
Now let us investigate how we can install the configuration file on our computer. At runtime, GSettings looks for configurations in the glib-2.0/schemas subdirectories of all directories specified in the XDG_DATA_DIRS environment variable. The usual location to install schema files is /usr/share/glib-2.0/schemas. But gsettings loads not the XML files directly but a "compiled binary" called gschemas.compiled, which is generated from all the XML files in that directory. In principle, we could copy our XML file into the /usr/share/glib-2.0/schemas directory, cd into that directory, and type "glib-compile-schemas ." to "compile" all the XML files, including our own, into the "gschemas.compiled" database. We would need root privileges for that. But that is a dangerous operation; if for some reason the resulting gschemas.compiled database is corrupted, then most of our GTK/Gnome programs would not work any more. So we better keep our own database separate. There are at least two ways for us to act as ordinary users without requiring root privileges.
Unfortunately, it is not enough to just put our XML file or the compiled version of that file into the same directory where our executable is located, as gsettings does not load schema files from the current directory automatically. But we can tell gsettings to load additional schemas from a specific directory by setting the GSETTINGS_SCHEMA_DIR environment variable, which is generally empty by default. So one method for a fast test of our program is
cd
mkdir testdir
cp gsettings.nim testdir
cp test.gschema.xml testdir
glib-compile-schemas testdir
testdir/gsettings
We create a new directory, copy our Nim source code and the XML file there, and call glib-compile-schemas for the whole directory. Finally, we can launch our application.
In a similar way, we can create a directory that will permanently store our own schema files, maybe named mySchemas. You must include an entry like
export GSETTINGS_SCHEMA_DIR="~/mySchemas"
in one of your shell startup scripts, such as.bashrc or similar, which are automatically executed when the computer boots. Of course, you have to execute "glib-compile-schemas" for that directory whenever you add more XML files.
Finally, a similar method is to add one more custom path to the XDG_DATA_DIRS environment variable. But then we have to respect the fact that the actual path is the glib-2.0/schemas subdirectory of the entries.
So we can add a line like
XDG_DATA_DIRS=$XDG_DATA_DIRS:~/myGsettingsStore/
to ~/.bashrc or equivalent files and populate that directory by commands like
mkdir -p ~/myGsettingsStore/glib-2.0/schemas
cp test.gschema.xml ~/myGsettingsStore/glib-2.0/schemas
glib-compile-schemas ~/myGsettingsStore/glib-2.0/schemas
References:
GTK Basic Widgets
In this chapter, we will introduce simple but useful basic widgets and explain the widgets that we introduced earlier in more detail. All these widgets are really easy to use. We have constructor functions that begin with "new," such as newButton(), and we can add these widgets to containers and connect them to signals directly or map them to GActions. You should also study the C API documentation of these simple widgets to learn about all the other functionality that is also available, like provided functions, available signals, or widget properties. Remember that GTK widgets build a class hierarchy, so functionality may be provided by parent classes. For example, the GtkCheckButton is a subclass of the GtkToggleButton, and both are, of course, widgets, so you may have to consult all that API documentation to find functions or properties that you may desire. Also consider using the devhelp tool to navigate the C API docs. For the more advanced and complicated widgets like GtkTreeView, GtkListView, and GtkDrawingArea, we will give only minimal examples in this chapter to give you a basic sense of what they are and how they can be used. GtkTreeView and GtkListView are powerful widgets for displaying large textual and other data sets. And the GtkDrawingArea is a widget where we can draw arbitrary two-dimensional graphics by using drawing functions from the Cairo graphics library. We can use the GtkDrawingArea for pure display purposes, or we can combine it with user input activities to create advanced CAD tools. One more advanced GTK widget is the GtkGLArea, which can be used to display three-dimensional OpenGL graphics. But as creating graphics with OpenGL is a wide area for which many whole books have been written, we will not try to cover that topic in this book.
The GTK widgets can be grouped into three types: container widgets that arrange other widgets, like GtkBox or GtkGrid; into mostly passive widgets for displaying data, like the GtkLabel; and active widgets that accept user input, like GtkEntry. For an overview, you may visit the widget gallery page:
Label
The GtkLabel is a simple widget that can display some text. The text can have multiple lines when desired, can wrap automatically, and can support style attributes like italic or boldface. The label widget is mostly used to label other widgets or to display some textual messages to the user. GtkButtons use label widgets to display their text. For the actual text display, the Pango library is used, which supports many advanced text renderings like right-to-left text and many attributes like strike-through, underline, overline (since Pango version 1.46), and many more. GtkLabels, like all GTK widgets, support utf-8 unicode text, which allows display of glyphs from exotic languages as well as a large range of symbols.
The GtkLabel is one of the simplest GTK widgets, and the C API documentation should be easy to understand and can be used in Nim straightforward:
Properties
GTK uses the concept of properties to set or modify the internal state of GTK widgets or other entities. For most properties, GTK offers setter and getter functions, which we use when available, so we don’t have to deal with properties that often. However, in some cases, it is necessary, so we will cover the fundamentals right away. GTK properties have textual names like "wrap" or "gtk-application-prefer-dark-theme" and a typed state like boolean true or false, integer states, or states of other types. In C code, most often the function g_object_set() is used to set one or multiple properties. That function uses multiple untyped arguments. As it is not type safe, it is not provided by gobject-introspection and is not available in most high-level GTK bindings, including Nim. Instead, we use g_object_set_property(), called just setProperty(), to set single properties in Nim. Unfortunately, that procedure needs a GValue as a third parameter, which makes its use a bit complicated.
The following example program defines a helper procedure called toBoolVal() to create a GValue with a matching type and content from a Nim bool value. We use the resulting GValue to set the wrap property of our label and the "gtk-application-prefer-dark-theme" property of our whole application. Both properties expect a boolean GValue.

import gintro/[gtk4, gobject, gio]

proc toBoolVal(b: bool): Value =
  let gtype = typeFromName("gboolean")
  discard init(result, gtype)
  setBoolean(result, b)

proc activate(app: gtk4.Application) =
  let d = gtk4.getDefaultSettings()
  setProperty(d, "gtk-application-prefer-dark-theme", toBoolVal(true))
  let window = newApplicationWindow(app)
  window.title = "Window"
  window.defaultSize = (100, 20)
  let box = newBox(Orientation.vertical, 20)
  window.setChild( box)
  let label1 = newLabel("This text does not wrap")
  let label2 = newLabel("But this very long text can wrap automatically")
  #label2.setWrap(true)
  label2.setProperty("wrap", toBoolVal(true))
  box.append(label1)
  box.append(label2)
  window.show

proc main =
  let app = newApplication("org.gtk.example")
  app.connect("activate", activate)
  let status = app.run
  quit(status)

main()
In our toBoolVal() procedure, we have to create a GType variable first. For this, we can use the typeFromName() proc, to which we have to pass the correct GTK type name, or, with recent gintro versions, we could use getType() procs like gBooleanGetType() directly. Guessing the right name is not always easy — for string types, we would have to use gStringGetType() or typeFromName("gchararray"). With that GType, we can first init() a GValue variable and then set its value. GValues are used a lot in the GtkListView and GtkThreeView widgets; we will learn more about GTypes and GValue variables later when we explain these widgets. In the above example program, we use the function setProperty() two times. First, we set the property "gtk-application-prefer-dark-theme" for our whole application to true. To do that, we query the default settings with a call to getDefaultSettings() and then set that boolean value. The result is that our whole app uses a dark color scheme when available. The second use of setProperty(), again for a boolean variable, is to set the "wrap" property of one of our label widgets. For this, the label class provides the function setWrap(), which we generally would use. We used a GtkBox to arrange our two labels vertically in our window. We will learn more details about the GtkBox containers in the next section.
While GtkLabels are most of the time passive entities, they provide some signals like "activate-link" and "move-cursor". By default, label text can not be copied to the clipboard, but we can call setSelectable() on a label widget to make it selectable. Then we can click with the mouse on the text, select all or part of the text, and the label widget will get a popup menu that pops up when we press the right mouse button, allowing us to select and copy the label text to the clipboard. This can be useful when a label displays messages that we may want to copy elsewhere. One of the many useful functions offered by labels is setEllipsize(), which determines how text not fitting into the available area is handled. That function is often used in conjunction with setMaxWidhChars() or setWidhChars(). Our second example program below displays some chess pieces using utf8 unicode glyphs and an ordinary text that is displayed in a small font and that is shortened by showing an ellipsis when the enclosing window is small. The label widget with the chess pieces is made selectable, so you can copy the content into another window, maybe into an instance of the the Gedit text editor.
import gintro/[gtk4, gobject, gio, pango]

proc activate(app: gtk4.Application) =
  let window = newApplicationWindow(app)
  let box = newBox(Orientation.vertical, 20)
  window.setChild( box)
  let label1 = newLabel()
  label1.setUseMarkup
  label1.setSelectable
  label1.setMarkup("<big>\u2654\u2655\u2656\u2657\u2658\u2659\u265A\u265B\u265C\u265D\u265E\u265F</big>")
  let label2 = newLabel("<small>Some less important message that nobody really reads</small>")
  label2.setUseMarkup
  label2.setEllipsize(pango.EllipsizeMode.end)
  box.append(label1)
  box.append(label2)
  window.show

proc main =
  let app = newApplication("org.gtk.example")
  app.connect("activate", activate)
  let status = app.run
  quit(status)

main()
In both label texts, we use HTML tags like <big> or <small> to modify the text display. Currently, we have to additionally call setUseMarkup() on the label to tell it that HTML tags should be used. We may expect that in the case that we use setMarkup(), that should not be necessary — maybe it is a bug of the early GTK 4 release? Modifying the label display directly with enclosed tags is convenient but limited to only a few attributes. In the next section, we will learn how we can use XML UI files to do more advanced text customization.
GtkLabels and XML UI files
Earlier in this book, we used already XML files to describe the structure of popup menus. And we said at the beginning of the book that GTK allows us to declare the whole GUI or parts of it with XML UI files, which are then loaded by the GTK builder. Below you can see such an XML UI file, that describes a label and two buttons, which are arranged into a GtkGrid widget.

<?xml version="1.0" encoding="UTF-8"?>
<interface>
  <object id="window" class="GtkWindow">
  <!--
  <object id="window" class="GtkApplicationWindow">
  -->
    <property name="title">Grid</property>
    <child>
      <object id="grid" class="GtkGrid">
         <child>
          <object id="label" class="GtkLabel">
            <property name="label">Label with red background</property>
            <attributes>
              <attribute name="weight" value="PANGO_WEIGHT_BOLD"/>
              <attribute name="background" value="red" start="11" end="14"/>
            </attributes>
            <layout>
              <property name="column">0</property>
              <property name="row">-1</property>
              <property name="column-span">2</property>
            </layout>
          </object>
        </child>
        <child>
          <object id="button1" class="GtkButton">
            <property name="label">Button 1</property>
            <layout>
              <property name="column">0</property>
              <property name="row">0</property>
            </layout>
          </object>
        </child>
        <child>
          <object id="button2" class="GtkButton">
            <property name="label">Button 2</property>
            <layout>
              <property name="column">1</property>
              <property name="row">0</property>
            </layout>
          </object>
        </child>
      </object>
    </child>
  </object>
</interface>
This UI file has the common shape of XML files. Contained widgets have a class that determines the type of the widget and an id that allows access to that widget from our program file. The outermost entity is the GtkWindow, with a GtkGrid as a child, which again has a label and two buttons as children. If using such XML files has more advantages than disadvantages, is not always clear, but the GTK developers generally recommend using them instead of creating the whole GUI structure in program code. Indeed, the XML UI file looks clean and simple most of the time, but creating valid files or debugging corrupted files is not that simple. We took our above file from the GTK4 source distribution and added only the label section, which is again taken from the GtkLabel API docs. GTK offers the tool Glade which allows to create such XML UI files interactively, we may explain that tool at the end of this book. But you should find some tutorials or videos about the Glade tool on the internet. One advantage of XML UI files is that by modifying that file, we can tune the GUI without recompiling the source code of the program. At least when the XML UI file is really shipped as a separate text file. But often, it is shipped as a compressed binary resource file or it is included as a string in the program source file. In the XML UI file above, we can change the label text, its appearance, or its presentation at all, and our program should still work! And the XML file makes it easy to tune the visible appearance of our label widget by use of attributes like "weight" or "background". Now let us investigate the program source code that uses above XML UI description:
# https://developer.gnome.org/gtk4/unstable/ch01s05.html
# builder.nim -- application style example using builder/glade xml file for user interface
# nim c --gc:arc builder.nim
import gintro/[gtk4, gobject, gio]

proc hello(b: Button; msg: string) =
  echo "Hello", msg

proc activate(app: Application) =
  let builder = newBuilder()
  discard builder.addFromFile("builder.ui")
  #let window = builder.getApplicationWindow("window")
  let window = builder.getWindow("window")
  window.setApplication(app)
  let label = builder.getLabel("label") # not really necessary, out label is fully passive
  var button = builder.getButton("button1")
  button.connect("clicked", hello, "")
  button = builder.getButton("button2")
  button.connect("clicked", hello, " again...")
  show(window)

proc main =
  let app = newApplication("org.gtk.example")
  app.connect("activate", activate)
  let status = app.run
  quit(status)

main()
Our program has again the well-known app structure. In the activate procedure, we create a builder object by calling newBuilder() and then load the GUI structure by calling addFromFile(). After that, we can access the widgets with calls like getWindow(), getButton(), or getLabel(). For the window, we have to set the application with a call to setApplication(). In the above code, we connect our widgets to our callback functions by use of the connect macro. In principle, that connection could be done in the XML UI files as well, but the gintro bindings do not support that currently and probably never will. Note that we call show(window) at the end of the activate() proc as we did in all of our apps before. It would be possible to save that proc call when we add the <property name="visible">True</property> to the window class in the XML file, but GTK developers regard this as a bad practice.
Mnemonics in Label Text
Mnemonics can be used in label widgets as some form of keyboard shortcuts: We can put the underscore character '_' in the text of a label to indicate that the following character should be a keyboard shortcut to activate a widget. That can be useful if we have a GUI window with multiple buttons or multiple text entry fields and we want to control the GUI from the keyboard without use of the mouse device. So we just have to press the left "alt" key and a matching key to activate a button or to activate an entry field to accept keyboard input. Mnemonics are not used that much in GTK 4 as GAction provides a more flexible way to map actions to various user input, but as mnemonics are still available and really easy to use, we will give a short example:
import gintro/[gtk4, gobject, gio]

proc entryCb(e: Entry) =
  echo "Searching for: ", e.text

proc activate(app: gtk4.Application) =
  let window = newApplicationWindow(app)
  let box = newBox(Orientation.horizontal, 10)
  window.setChild(box)
  let label = newLabelWithMnemonic("_Find")
  label.setUseUnderline(true)
  let entry = newEntry()
  let dummy = newEntry()
  label.setMnemonicWidget(entry)
  entry.connect("activate", entryCb)
  box.append(label)
  box.append(entry)
  box.append(dummy)
  discard dummy.grabFocus
  window.show

proc main =
  let app = newApplication("org.gtk.example")
  app.connect("activate", activate)
  let status = app.run
  quit(status)

main()
The code above creates a label with Mnemonics support and two text entry fields. We would need only the search entry field, but as long as it is the only one, it would always get user input, so we add one more dummy entry that can get keyboard focus. We create the label widget with a call of newLabelWithMnemonic("_Find"). The underscore in front of the 'F' character indicates that this character should be used as a keyboard shortcut. The call of setUseUnderline(true) tells the label widget that keyboard shortcuts should be really used, and setMnemonicWidget() tells which other widget should be activated by the label. You may wonder why the call of setUseUnderline(true) is necessary when it is obvious from the use of newLabelWithMnemonic() that shortcuts should be used. But it is indeed necessary currently; maybe it is still an early GTK 4 bug. Often label widgets are contained in other widgets, i.e., in button widgets. In that case, the call of setMnemonicWidget() is not needed, the enclosing widget is activated in that case. To use the shortcut, you press the left "alt" key and the letter "f" which will make the search widget active accepting keyboard input. Maybe click with the mouse into the dummy widget before to see the effect better. Pressing the left "alt" key underlines the action key in the label widget to give you a hint as to which key is in use. In our example, we put the underscore in from of the first capital letter of our label text. But we can put it everywhere in the text string, and lower- and upper-case characters work the same. A call of newLabelWithMnemonic("Fi_nd") would make "alt" "n" the shortcut. Unfortunately, these form of shortcut definitions can easily lead to conflicting characters when many shortcuts are in use or when the program is translated into other languages.
Pango Text Attributes
At the end of this section, we will investigate how we can modify our label text through the use of Pango attributes. The following example program creates two Pango attributes, one to modify the background color of our label and another one to display the label text as strikethrough. For both attributes, we set the range where we want to apply them. Attributes can overlap. Then we create an attribute list, add our two attributes to the list, and finally call setAttributes() to apply the attribute list to our label.

import gintro/[gtk4, gobject, gio, pango]

proc activate(app: gtk4.Application) =
  let window = newApplicationWindow(app)
  let label = newLabel("Some text with red background and overlapping strikethrough")
  let attrColor = newAttrBackground(uint16.high, 0, 0) (1)
  let attrStr = newAttrStrikethrough(true) (2)
  attrColor.startIndex = ATTR_INDEX_FROM_TEXT_BEGINNING + 15 (3)
  attrColor.setEndIndex(29.uint32) (4)
  attrStr.indices = (24.uint32, 32.uint32) (5)
  let attrList = newAttrList() (6)
  attrList.insert(attrColor) (7)
  attrList.insert(attrStr)
  label.setAttributes(attrList) (8)
  window.setChild(label)
  window.show

proc main =
  let app = newApplication("org.gtk.example")
  app.connect("activate", activate)
  let status = app.run
  quit(status)

main()| 1 | create a background color attribute using RGB color values with range 0 .. uint16.high |
| 2 | create a strikethrough attribute |
| 3 | set start index. Index starts at zero, so we can use the constant ATTR_INDEX_FROM_TEXT_BEGINNING (0.uint32) |
| 4 | set end index, the constant ATTR_INDEX_TO_TEXT_END is an alias for uint32.high |
| 5 | we can also use a tuple assignment |
| 6 | create a new attribute list |
| 7 | insert our two attributes into the attribute list |
| 8 | apply the attribute list to our label |
For setting the index ranges of our attributes, we can use set functions, value assignment, or tuple assignment. The gintro language bindings do not yet support setting the indices directly in the call to the attribute constructor, as is done in Python GTK bindings. We may declare such extended constructors manually if we really need them often, but generally, labels with many Pango text attributes are not used that often. Note that the indices use the data type uint32 and that the indices count byte positions, not Unicode glyphs.
Another option to modify the visual appearance of GTK labels and other widgets is the use of CSS (Cascading-Style-Sheets). We will learn more about CSS later in this book.
References:
Box
The GtkBox is a simple container widget that is used to arrange child widgets into a single row or column, depending on the value of its “orientation” property.
We used box widgets already in the introductory sections of this book. In this section, we will explain some properties and functions of the GtkBox widget in more detail. The following example program creates a horizontal box, which will arrange its child widgets in a single row.
import gintro/[gtk4, gobject, gio, pango]

proc activate(app: gtk4.Application) =
  let window = newApplicationWindow(app)
  let box = newBox(Orientation.horizontal, 20)
  #box.baseLinePosition = BaselinePosition.bottom
  #box.setHomogeneous
  window.setChild( box)
  let label1 = newLabel("<small>Available\nchess pieces</small>")
  label1.setYalign(1) # bottom
  label1.setUseMarkup
  let label2 = newLabel()
  label2.setMarkup("<big>\u2654\u2655\u2656\u2657\u2658\u2659\u265A\u265B\u265C\u265D\u265E\u265F</big>")
  label2.setYalign(1)
  #label2.setUseMarkup # set from setMarkup() call
  box.append(label1)
  box.append(label2)
  window.show

proc main =
  let app = newApplication("org.gtk.example")
  app.connect("activate", activate)
  let status = app.run
  quit(status)

main()
We use newBox(Orientation.horizontal, 20) to create the container widget. The first parameter determines the orientation, and the optional second parameter the empty space between its children in logical pixels. We add that box as a child of our window by calling setChild(). Finally, we create two label widgets, append both to the box, and call show() on our window to display all of our widgets. The first label has two rows of text (\n inserts a line break) and we apply the pango attribute <small> to decrease the text size. The second label has only one text line with unicode glyphs, and we apply the attribute <big> to make it appear larger.
The GtkBox class provides the functions append() and prepend() to add new child widgets at the end (right/bottom) or start (left/top) of the container. We can also use insertChildAfter() to insert a new widget after an already-inserted one. Removing children from a box widget or reordering of children is also possible by using the remove() or reorderChildAfter() functions. But these operations are not that common, and we would need access to the already contained children for these operations. The widget parent class of the box widget provides various functions to access contained children; we will learn more about that later in this book. When we use insertChildAfter() to insert a widget, then we have to be sure that the "after" widget is really a child of that box, and when we use reorderChildAfter(), then of course both child widgets have to be in the box. If that is not the case, then a GTK runtime error will occur. An useful function of the GtkBox widget is setHomogeneous() which can be used to give all children in the box the same size extend. The function setSpacing() can be used to modify the pixel spacing for all the child widgets. Note that GTK uses logical pixels — for high-resolution displays, one logical pixel can correspond to multiple physical pixels, depending on the user’s GUI settings. For horizontal boxes, the GtkBox class provides the function setBaselinePosition(), which is not used that often and has only an effect when at least one of the widgets in the box has set its valign property to Align.baseline. For our example, we do not use the function setBaselinePosition(), but we use the fact that label widgets by default use all available space in a box, and we call the function setYalign(1) for both labels to align the text to the bottom.
As the children of GtkBox widgets can be again boxes, we can construct interesting two-dimensional layouts. At the beginning of the book, we have already used the GtkGrid widget to arrange children in a tabular layout, and you may wonder if the GtkGrid can completely replace nested boxes. But that is not always possible, as the GtkGrid generates layouts that look like a regular matrix, with optionally joined cells. And sometimes using boxes is simpler or more flexible than using grid widgets. The following program generates a layout with three nested box widgets that would not be possible to archive with a single grid widget:

import gintro/[gtk4, gobject, gio]

proc activate(app: gtk4.Application) =
  let window = newApplicationWindow(app)
  let hbox1 = newBox(Orientation.horizontal, 25)
  let hbox2 = newBox(Orientation.horizontal, 25)
  let vbox = newBox(Orientation.vertical)
  var l: Label
  for el in ["A", "B", "C"]:
    l = newLabel(el)
    l.hexpand = true
    hbox1.append(l)
  for el in ["D", "E"]:
    l = newLabel(el)
    l.hexpand = true
    hbox2.append(l)
  vbox.append(hbox1)
  vbox.append(hbox2)
  window.setChild(vbox)
  window.show

proc main =
  let app = newApplication("org.gtk.example")
  app.connect("activate", activate)
  let status = app.run
  quit(status)

main()
Finally we should mention, that the GtkBox widget implements the GtkOrientable interface, so that we can flip existing boxes dynamically at run-time of our program. Here flip stand for rotate by 90 degree, we switch between Orientation.horizontal and Orientation.vertical. That can be useful in rare cases, e.g., when the containing window is resized by the user. The following app flips the box when the user clicks on the button widget. We will learn more details about the GtkButton widget later in this book.
import gintro/[gtk4, gobject, gio]

proc flipBox(b: Button; box: Box) =
  box.setOrientation(Orientation(1 - box.getOrientation.ord))

proc activate(app: gtk4.Application) =
  let window = newApplicationWindow(app)
  let box = newBox(Orientation.vertical, 20)
  window.setChild( box)
  let label = newLabel("You can flip this box")
  let button = newButton("Flip")
  button.connect("clicked", flipBox, box)
  box.append(label)
  box.append(button)
  window.show

proc main =
  let app = newApplication("org.gtk.example")
  app.connect("activate", activate)
  let status = app.run
  quit(status)

main()| Remember that each Gtk widget can be put at least once into a GTK container widget. Whenever you try to insert the same widget again in the same or into another container, then you will get a GTK run-time error. This means that you would have to create multiple label widgets for the case that you wanted to display the same text multiple times. You can not reuse the same widget. Also you should avoid trying to copy widgets, use one more constructor call like newLabel("My message") instead. Maybe later the gintro bindings will support the copying of widgets, but currently they do not support it. This does not mean that you cannot reuse widgets: You can remove widgets from containers and insert them in another container or again in the same container. In C, some caution is needed, as widgets may get destroyed when we remove them from containers due to GTK’s refcounting system. So in C, we generally call g_object_ref() on the widget before we remove it from a container to keep it alive until we insert it again. In Nim referencing widgets that way should not be needed. We may give examples for removing and re-inserting widgets with the gintro bindings later in the book. |
References:
Button

The GtkButton widget is used to trigger a callback function that is called when the button is pressed. Generally, the GtkButton widgets contain a label widget, which is used to display a short text, or a symbolic icon. But the GtkButton can also contain most other GTK widgets. The GtkButton widget supports only two signals: the "clicked" and the "activate" signal. We use only the "clicked" signal to call our callback function when the button is pressed. The "activate" signal is for GTK internal use only. The program below creates a box container widget and fills it with various button variants:
For the button b1, we pass a text argument to the constructor function newButton(). That way, a label is created, which is used to display that text on the button. In the section about GtkLabel widgets, we explained that GTK supports mnemonics to activate widgets. To use mnemonics, we put an underscore character (_) into a text string to make the following character a keyboard shortcut, which is activated by pressing the ALT key and that character simultaneously. We use that for button b2. For button b3, we decided to display an icon instead of a textual message. For that, we call the newButtonFromIconName() constructor and pass a valid icon name. To get an overview of the available icons, you may launch the gtk4-icon-browser. The button b4 is again a plain GtkButton, but we use Unicode glyphs as text. Button b5 is a GtkToggleButton, a subclass of the parent GtkButton. The GtkToggleButton behaves like a mechanical switch and is drawn differently when in a pushed-down state. The toggle button supports, in addition to the "clicked" signal of its parent class, the "toggled" signal, which is emitted whenever the state changes between the pressed and released states. Generally, we would connect the toggle button to the "toggle" signal, but to keep our program short we also use the available "clicked" signal. Finally, button b0 is again a plain GtkButton, but we use CSS styling to change its colors. We said earlier that CSS can be used to customize the GTK GUI. Here we give only a very simple example to show that it is possible. Beginners generally ask about functions for styling widgets and expect at least a simple function to set foreground and background colors and maybe some more widget properties. Most of the time, GTK does not offer such simple styling functions. One reason for that is that GTK3 and GTK4 uses not just plain background and foreground colors but can use also background images, color gradients, transparency effects, and much more. The other reason is, that customizing widgets, is in most cases a bad idea. The themed GTK GUI is designed carefully for a nice appearance, and the user may have customized it further for her own needs. Maybe the user has selected a high contrast color scheme and larger fonts because of visual restrictions. As a result, graphically customized widgets or entire apps generally look ugly and may be inaccessible to some users.
But with CSS, custom styling is generally possible with some effort. In our example, we call the function newCssProvider() to create a CssProvider object and load it from a string with the desired style properties. For simple style changes, using a plain string as source is convenient, but for larger customization, the function loadFromPath() can be used to load the data from an external CSS text file. The data string starts with the name of the widget that we want to modify, followed by the necessary information enclosed in curly braces. As we have direct access to our widget, we call getStyleContext() to get its style context and then call addProvider() to add our new CSS information. This way, we can change the size, margins, and padding of widgets and many other styling properties. But these forms of styling are not always that easy and may sometimes not work as expected at all. For styling widgets which are not directly accessible but contained deeply nested in other widgets, we have to use the function addProviderForScreen(getDefaultScreen(), …) instead of the pair getStyleContext() and addProvider(). In the second half of the book, we will learn more about CSS styling and we will discover the gtk-inspector tool, which allows us to inspect and even modify CSS properties and other useful data interactively from running applications.
To keep our example code short, we connect all of our buttons to the same plain callback function, which only prints the message "clicked" when one of the buttons is pressed. Earlier in the book, we introduced GActions and showed how we could connect actions with widgets, keyboard input, and other input sources. For larger applications the use of GActions may be a better solution than connecting signals directly to callbacks. We should also mention that the GtkWidget parent class of the GtkButton provides the function setSensitive(), which can be used to make widgets insensitive. For button widgets, that means that mouse clicks are ignored.
For advanced use cases, we can use the newButton() constructor without arguments and then call setChild() on the button instance to explicitly set a child widget. The child widget may be a label styled with Pango attributes, an icon or image widget, or most other widget classes. When the child of the button is a label widget, then the function getLabel() can be used to get the label text. To set a new label text, the function setLabel() can be used.[4] The function setIconName() can be used to set a named icon as a child of the button — an existing child is replaced. To set an existing widget as a child of a button, the function setChild() is available, and getChild() can be used to retrieve a child, maybe to modify it. Finally, we can use the function setHasFrame() with a boolean argument to determine if a frame should be drawn around the button.
Direct children of the GtkButton class are the already mentioned GtkToggleButton, the GtkLinkButton, and the GtkLockButton. A GtkToggleButton is a GtkButton that will remain “pressed-in” when clicked. Clicking again will cause the toggle button to return to its normal state. A toggle button is created by calling either newToggleButton() or newToggleButtonWithMnemonic(). When you pass a string parameter to the first function, then a label widget is created as a child; otherwise, you should call setChild() to set the child widget. The state of the toggle button can be set by calling setActive() on the toggle button instance, and retrieved by calling getActive(). Finally, the function setGroup() is available to set the group for the button instance, which is a related set of other toggle buttons. In a group of multiple toggle buttons, only one button can be active at a time. The group of toggle buttons behaves like radio buttons in this case; that is, you press one and the previuosly pressed one releases automatically. Note that the same effect can be achieved via the GtkActionable API, by using the same action with parameter type and state type 's' for all buttons in the group and giving each button its own target value.
Toggle buttons have the advantage that they use the area of the label text for their function, so no additional space is consumed. But unfortunately, it can be difficult to determine the actual state of the toggle button from its visual appearance. ((GtkRadioButtons are additional available. Other buttons with a retained boolean state, such as the GtkCheckButton, GtkSwitch, and GtkRadioButtons, are thus available as alternatives. Furthermore, GTK provides many specialized buttons such as font-, color-, file-, menu-, and spinbuttons. You may visit the widget gallery linked below to discover more button like classes. We will describe a few of them in the following sections of the book.
Note that you can also use a GtkBox populated with multiple widgets as a child of button widgets. That way, for example, it is possible to have a textual label and an icon as the active area of a button.[5]
References:
Link-, Lock- and Toggle-Button

The GtkLinkButton, the GtkLockButton, and the GtkToggleButton are direct subclasses of the GtkButton. The GtkToggleButton maintains a boolean state and changes its visual appearance when in the pressed-down state. We discussed the toggle button already in the previous section, together with the plain GtkButton widget.
The GtkLinkButton is a GtkButton with a hyperlink, similar to the ones used in HTML web pages. It is useful to show references to resources like the help or support pages of our app. A link button is created by calling the constructor function newButton() with a string containing an URI and optionally with an additional label text argument. The URI bound to the GtkLinkButton can be set specifically by calling the setURI() function, and retrieved by calling getURI().
By default, the GtkLinkButton widget calls showURI() when the button is clicked. This function launches the default application for showing a given URI or shows an error dialog if that fails. This behaviour can be overridden by connecting to the “activate-link” signal of the link button and returning gdk4.EVENT_STOPT from the callback function.
The GtkLockButton is a widget that can be used in control panels or preferences dialogs to allow users to obtain and revoke authorizations needed to operate the controls. The required authorization is represented by a GPermission object. Concrete implementations of GPermission may use PolicyKit or some other authorization framework. As GtkLockButtons are used most often only in system tools and we have to learn about GPermission to use it, we will not discuss that button in detail.
The following program creates a GtkLockButton and a GtkLinkButton. The lock button has no function. The link button is connected to a callback function that prints the URI when the button is clicked.
The newLockButton() constructor function expects a permission object as an argument, which we create by calling newSimplePermission(false) with the default false state. In a real application, we would have had to provide code for handling that button. To the newLinkButton() constructor, we pass an URI and a label text as arguments. We connect the "activate-link" signal to a callback function that prints the URI when the link is clicked. While most of the callback functions that we used in our previous examples had no return parameter, the callback function of the "activate-link" signal has to return a boolean value. In this case, the return value determines if or if not that signal is further processed when our own callback is done. We can return the boolean constants gdk4.EVENT_PROPAGATE to allow processing of that signal by other functions, or gdk4.EVENT_STOP to stop the propagation. In our example, we return gdk4.EVENT_PROPAGATE at the end of our callback function to allow further processing by GTK. The result is that a web browser with our specified URI is opened automatically when available. If we do not want that behaviour we could return gdk4.EVENT_STOP to avoid this.
We can construct a link button with a call to newLinkButton() that passes only a URI string if the button should display the URI, or we can call newLinkButton() with an additional string that is used as label text. Later, we can extract the URI string with a call to getURI() or set a different URI with setURI(). After the user has clicked on the button for the first time, the boolean property "visited" is set to true and the look of the button changes. We can set and query the visited state with the getVisited() and setVisited() functions.
References:
Check-Button

The GtkCheckButton is a widget with a label and a discrete toggle button. In GTK 4, the GtkCheckButton is a direct child of the GtkWidget class. A group of multiple check buttons can form a set of radio buttons in which only one button can be active at a time. For that variant, pressing down one member of the group releases the previously pressed one automatically, like for station or wavelength-range keys of historic broadcast radio devices.
The following example program creates 3 ordinary check button widgets and 3 radio button variants:
A radio group is created by calling setGroup() on all but the first member. The first setGroup() call creates the initial group with only two members, and each subsequent call of setGroup() adds one more button to that group. We connect all of our check buttons to the same callback function to keep the example code short. The callback function extracts the label text from the check button passed as an argument and prints its new state. Note that for the radio buttons, one click on a button to activate it automatically releases the previously pressed button in the group, resulting in one additional call of our callback function. We create a new check or radio button with a call to newCheckButton(). When we give a string argument, the button gets a label next to the active area. In most cases, we need a label to inform the user about the purpose of that button, but when our check button has a neighborhood relationship with another widget, a label may not be necessary. We can later set or modify the label text with setLabel() or retrieve the label text with getLabel(). As for most widgets, we can also create check buttons with mnemonics by using the constructor function newCheckButtonWithMnemonic() or by later activating of mnemonics by calling setUseUnderline() on the check button widget. The function setGroup() is used to group multiple check buttons into a radio group. Note that the same effect can be achieved via the GtkActionable API by using the same action with parameter type and state type 's' for all buttons in the group and giving each button its own target value. The boolean state of check buttons can be set with a call to setActive() and queried with a call to getActive(). Finally, the check button widget provides the function setInconsistent() to set the visual state of a button to an "in between" state. This function affects only the visual appearance of the button, not its functionality. This may be necessary when there is a temporary no clear boolean state for a property. Generally, we would set the widget to a consistent state as soon as possible by calling setInconsistent() with a false argument, i.e., when the user clicks that button again or when other conditions change.
References:
Switch
The GtkSwitch is one more simple widget with a boolean on/off state. The user can switch the state by clicking in the empty area or by dragging the handle. The GtkSwitch consists only of the graphical symbol with its active area; there is no label text directly connected to the switch widget. So the GtkSwitch is generally placed beside another widget so that the user can guess on what the switch works. The position of the slider and the color of the active area indicate the switch’s on/off state, which should be clear enough for the default GUI theme. The GtkSwitch can also handle situations where the underlying state changes with a delay, i.e., when the user turns on Bluetooth or WLAN. The example program below creates a horizontal box with two label widgets and two switches:
import gintro/[gtk4, gdk4, gobject, glib, gio]

proc switchCb(s: Switch; newState: bool; num: int): bool =
  echo "switched ", num, " to ", newState
  return gdk4.EVENT_PROPAGATE

proc activate(app: Application) =
  let window = newApplicationWindow(app)
  let bh = newBox(Orientation.horizontal, 10)
  let l1 = newLabel("Switch 1")
  let l2 = newLabel("Switch 2")
  let s1 = newSwitch()
  let s2 = newSwitch()
  s1.connect("state-set", switchCb, 1)
  s2.connect("state-set", switchCb, 2)
  for w in [l1, s1, l2, s2]:
    bh.append(w)

  window.setChild(bh)
  window.show

proc main =
  let app = newApplication("org.gtk.example")
  app.connect("activate", activate)
  let status = app.run
  quit(status)

main()
We use the same callback function for both switches and connect it to the "state-set" signal. To discriminate between the two switches, we pass an additional parameter to our callback function. The callback function receives the new state of the switch via a boolean parameter and has to return a boolean result indicating if the signal should be further processed by other signal handlers or if the signal emission should stop. When our callback function returns gdk4.EVENT_STOP then the signal is not further processed by GTK, which means that the user action changes only the position of the slider but the color of the switch widget does not change automatically. That can be used to indicate delayed state changes, like turning on WLAN or Bluetooth. In that case, we call setState() when the state change is complete to bring the switch to a consistent state.
References:
ComboBoxText

The GtkComboBoxText widget is a simple variant of the GtkComboBox that hides the model-view complexity for simple text-only use cases. That widget behaves similarly to a pop-up menu. When we click on the widget, a list of text strings pops up, and we can select one string from the list. That widget supports the "changed" signal. The connected callback function is called whenever the user selects a different string from the list. We create a ComboBoxText with the constructor function newComboBoxText() and can add entries by using appendText(), insertText(), and prependText(). There are also functions append(), insert(), and prepend() that allow to additional specify a string id for each entry, but these functions are not too useful for the plain GtkComboBoxText variant. We can remove text entries by calling the function remove() with the element index as an argument, or we can use removeAll() to clear the whole list. We can also create a list with an additional entry field by calling the constructor function newComboBoxTextWithEntry(), which allows the user to type in arbitrary text strings. In the callback function, we can access the index of the user selection with the getActive() function and the corresponding text with getActiveText().
import gintro/[gtk4, gobject, gio]

proc changed(cbt: ComboBoxText) =
  echo "changed to: ", cbt.getActive, " ", cbt.getActiveText

proc activate(app: gtk4.Application) =
  let window = newApplicationWindow(app)
  let cb = newComboBoxText()
  for t in ["zero", "one", "two", "three"]:
    cb.appendText(t)
  cb.setActive(0)
  cb.connect("changed", changed)
  window.setChild(cb)
  window.show

proc main =
  let app = newApplication("org.gtk.example")
  app.connect("activate", activate)
  let status = app.run
  quit(status)

main()
The above program creates four list entries and connects the callback function to the "changed" signal. The function setActive() is called to pre-select an entry.
References:
Text

The GtkText widget is a single-line text entry field. It provides the basic functionality for the GtkEntry and the GtkSearchEntry widgets. Those widgets provide optical decorations like a frame and can display icons or a progress display, while the GtkText itself has no decorations. We also have the GtkTextView widget for multi-line editables.
The GtkText widget provides a single-line text entry field with all the advanced editing functionality like scrolling when the entered text is larger than the widget allocation, cursor movement, delete and backspace support, and a popup menu with cut, copy, and paste support. It is even possible to expand that popup menu with more menu entries, but that requires some effort and is not often necessary, so we will not demonstrate it in this section.
The following program creates three variants of the GtkText widget. The first widget shows a message about its purpose as long as the user has not yet entered any actual text. The second text field sets its visibility property to false to hide the entered text, as is common for password entries. The third text entry field is an ordinary GtkText widget, but we use the function setMaxWidthChars(4) to restrict its size to exactly 4 characters. Note that GtkText is a direct child of GtkWidget, and it implements the GtkEditable interface, from which we took the setMaxWidthChars() function. The GtkEntry widget, which uses the functionality of GtkText, is also a direct child of the GtkWidget class but not a child of GtkText.
import gintro/[gtk4, gobject, gio]

proc activate(t: Text) =
  echo "You entered: ", t.buffer.text

proc activate(app: gtk4.Application) =
  let window = newApplicationWindow(app)
  let box = newBox(Orientation.horizontal, 20)
  window.setChild( box)
  let t1 = newText()
  let t2 = newText()
  let t3 = newText()
  let f1 = newFrame()
  let f2 = newFrame()
  let f3 = newFrame()
  f1.setChild(t1)
  f2.setChild(t2)
  f3.setChild(t3)
  box.append(f1)
  box.append(f2)
  box.append(f3)
  t1.placeHolderText = "Search ..."
  t2.visibility = false
  t3.setMaxWidthChars(4)
  for t in [t1, t2, t3]:
    t.connect("activate", activate)
  window.show

proc main =
  let app = newApplication("org.gtk.example")
  app.connect("activate", activate)
  let status = app.run
  quit(status)

main()
In the example program above, we put each text widget into a GtkFrame widget to better show its extents. The GtkFrame is a decorative container that is used to frame single widgets or visually group multiple widgets. The GtkText class provides many functions to adapt its appearance or its functionality, which we cannot discuss all of here. Whenever you need some special function, you should consult the GtkText API as well as the related classes like GtkEditable and GtkWidget. As usual, we create the text fields with the newText() constructor. For each text field, we create a frame widget, put all the frame widgets into a horizontal box, and finally set that box as a child of the main window. We use the "activate" signal to connect all the text fields to the same callback function, which prints the entered text when the user hits the return or enter key. Note that the GtkText widget uses an GtkEntryBuffer object to store the actual text content. In our callback function, we had to access the buffer object to get the actual text content. Buffers can be shared between multiple text fields, but that is only useful in rare cases. Also note that we can use the function setAttributes() to style the text of a text field with Pango text attributes, maybe to change the font size or colors. For details about pango text attributes, refer to the GtkLabel section.
In our example program, we used the activate signal to call our callback function whenever the user confirms his input by pressing the return or enter key. In a few cases, we may desire an immediate call of a callback function whenever the user modifies the input without waiting for confirmation by return or enter. This is indeed possible when we make use of the fact that the GtkText widget implements the GtkEditable class, which supports the "changed" signal. So we can add a modified callback in this way:
proc changed(e: Editable) =
  echo "You entered just now: ", e.getText
# ...
  for t in [t1, t2, t3]:
    connect(cast[Editable](t), "changed", changed)
Currently, casting the text fields to editable is necessary to make this work, as current gintro bindings do not seem to provide a converter function from GtkText to GtkEditable.
References:
Entry
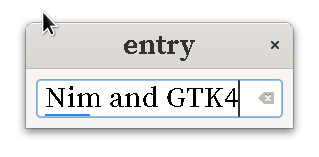
The GtkEntry is a single-line text entry widget. It provides most of the functionality that we already know from the GtkText widget. Even though it is not a subclass of GtkText but a direct subclass of GtkWidget, the GtkEntry uses the GtkText widget functions internally Like the GtkText widget, the GtkEntry widget implements the GtkEditable interface. The entry widget supports basic editing functions, and pressing the right mouse button over its active area opens a popup menu that provides cut/copy/paste functionality and allows us to insert Unicode symbols. If the entered text is longer than the visible size of the input field, then the text scrolls so that the cursor position is always visible. When using an entry for querying passwords or other sensitive information, the widget can be put into “password mode” using the setVisibility() function. In this mode, entered text is displayed using “invisible” placeholder characters. By default, GTK uses the best placeholder character that is available in the current font, but the character can be changed with the function setInvisibleChar(). The GtkEntry widget also has the ability to display progress or activity information. We can call the function setProgressFraction() to display a progress state between 0 and 1, or we can call setProgressPulseStep() and progessPulse() to move the progress bar in steps, maybe bouncing back and forth. Additionally, GtkEntry can display icons on either side of the entry. These icons can be activated by clicking, can be set up as drag sources, and can have tooltips.[6]
The following program creates an entry widget with placeholder text, an icon at the right, and a progress indicator:
import gintro/[gtk4, gobject, gio]

proc activate(e: Entry) =
  echo "You entered: ", e.buffer.text
  e.progressPulse
  #entry.setProgressFraction(0.7) # use this if we know the exact progress state in %

proc iconPress(e: Entry; p: EntryIconPosition) =
  echo "You clicked: ", p
  discard e.buffer.deleteText(0, -1) # delete all

proc activate(app: gtk4.Application) =
  let window = newApplicationWindow(app)
  let entry = newEntry()
  entry.marginStart = 10
  entry.marginEnd = 10
  entry.marginTop = 10
  entry.marginBottom = 10
  entry.setProgressPulseStep(0.2)
  entry.setPlaceholderText("Enter some text")
  entry.setIconFromIconName(EntryIconPosition.secondary, "edit-clear")
  entry.setIconActivatable(EntryIconPosition.secondary, true)
  entry.connect("activate", activate)
  entry.connect("icon-press", iconPress)
  window.setChild(entry)
  window.show

proc main =
  let app = newApplication("org.gtk.example")
  app.connect("activate", activate)
  let status = app.run
  quit(status)

main()
The icon is connected to the iconPress() callback function, which clears the text buffer. Whenever we enter some text in the widget, the connected activate() callback function prints that text to the terminal window and pulses the progress bar. To increase the visibility of the widget’s border frame and the pulse bar, we set the margins to 10 logical pixels for all four borders of the entry widget. The GtkEntry C API provides some more functions to customize entry widgets for concrete use cases. The purpose of those functions should be obvious; for details, you can consult the C API documentation.
References:
SpinButton
The GtkSpinButton widget looks and behaves similarly to the GtkEntry widget, but it is used for numeric input and has two buttons in addition to the input field that allow you to increment or decrement the displayed numeric value with the mouse rather than the keyboard. The GtkSpinButton can restrict the input values to an allowed range and round them to a specified precision, i.e., the number of decimal places.
The spin button uses an internal GtkAdjustment object to store the allowed input ranges, the current value, and the used increments. Internally, both the adjustment and the spin button store and process the numeric value as a C double, but some functions like getValueAsInt() allow us to retrieve the rounded integral value.
The entry field of the spin button widget has by default the correct size to display all values of the allowed input range with the desired precision. But this automatic sizing can be overwridden by explicitly setting the “width-chars” property.
The following example program creates two spin button widgets and connects both to a valueChanged() callback function that is called whenever the numeric value is changed by user input:
First, we create two adjustment objects with a call to the newAdjustment() constructor function. That constructor has six arguments of type C double (Nim float) — the last one is the pageSize, which is zero by default and ignored for spin buttons. The other five numbers are the initial value, the lower and upper bounds of the valid input range, and the step- and page-increments. The step increment is the amount by which the displayed value changes when we click on one of the two buttons with the left mouse key or when we press the up or down array keys of our keyboard. The page increment is used for larger steps — when the middle mouse button is pressed or when the shift key is held while the arrow keys of the keyboard are used.
To create a spin button, we pass the adjustment object and two numeric values to the newSpinButton() constructor function. The numeric values are the climb rate and the number of decimal digits to display. Understanding the climb rate is not that easy. When we press the up or down buttons with the mouse or hold the up or down array keys of the keyboard pressed for a longer period of time, then the numeric values continuously increase or decrease. When we set the climb rate to zero, the increase or decrease rate is constant. But when we set the climb rate to a value greater than zero, then the steps with which the contents change increase in size, allowing a faster but less accurate adjustment.
For our first spin button, we intend a valid input range from zero to 100 with a start value of 50, and we do not want fractional results, so we set the last parameter digits in the newSpinButton() call to zero. To allow fast modifications of the input value with the mouse or with the arrow keys, we use a climb rate of 5.
Our second spin button’s input range should be 0.00 to 10.00. We use a climb rate of zero to ensure that value changes occur in 0.01 increments at all times.
When we launch our program, type the value zero into the first spin button, and press the "value increase" button of both widgets for a longer time period, we get these values printed in the terminal window:
value changed: 0.0 (0)
value changed: 1.0 (1)
value changed: 2.0 (2)
value changed: 3.0 (3)
value changed: 4.0 (4)
value changed: 5.0 (5)
value changed: 6.0 (6)
value changed: 7.0 (7)
value changed: 8.0 (8)
value changed: 14.0 (14)
value changed: 20.0 (20)
value changed: 26.0 (26)
value changed: 32.0 (32)
value changed: 38.0 (38)
value changed: 44.0 (44)
value changed: 55.0 (55)
value changed: 66.0 (66)
value changed: 77.0 (77)
value changed: 88.0 (88)
value changed: 99.0 (99)
value changed: 100.0 (100)

value changed: 0.01 (0)
value changed: 0.02 (0)
value changed: 0.03 (0)
value changed: 0.04 (0)
value changed: 0.05 (0)
value changed: 0.06 (0)
value changed: 0.07000000000000001 (0)
value changed: 0.08 (0)
value changed: 0.09 (0)
value changed: 0.09999999999999999 (0)
value changed: 0.11 (0)
value changed: 0.12 (0)
So for the first spin button, we get increments of one for the first eight values, then the increment increases by 5 to 6, and finally the increment increases again by 5 to 11. The final value is clamped at 100. For the second spin button, the increment has the constant value of 0.01, but we have to care for the fact that floating point numbers are approximations of real numbers, so we may have to restrict the number of decimals when we print the values. And of course we have to avoid tests for exact equality, as they generally fail for floats due to tiny numeric errors.
GTK also provides a newSpinButtonWithRange() constructor function, which needs only the arguments min, max, and step and no adjustment object as a parameter. The other values, like the initial value, increment, and precision, are then automatically generated. In general, using this function makes little sense because we have to remember how all the unspecified settings are deviated and because we rarely get exactly what we need. The function setAdjustment() can be used to replace the adjustment object of a spin button, and the function setDigits() is available to set the displayed number of digits after the decimal point. The functions setRange() can be used to modify the input range, and setIncrements() can be used to modify the step and page increments. Retrieving these values is possible with the corresponding getter functions, like getRange(). Finally, we can set and get the numeric value with getValue() and setValue(), or we can retrieve the value as an integral number with getValueAsInt(). The function setWrap() allows us to determine if a spin button value wraps around to the opposite limit when the upper or lower limit of the range is exceeded, and with setSnapToTicks(), we can control whether values are set to the nearest multiple of the step increment when a spin button is activated after providing an invalid value. By calling the configure() function and passing an adjustment object, a climb rate, and the number of digits, we can also fully reconfigure a spin button. Finally, we can call the functions spin() to increment or decrement a spin button’s value in a specified direction by a specified amount, or call the update() function to manually force an update of the spin button.
In the example program above, we used the "value-changed" signal to connect our callback function. For that signal, our callback function is called when the user presses the up or down buttons, the up or down array keys of the keyboard, or when the user has typed in a new value and then confirms the value by pressing enter. If the value is unchanged or clamped, our callback is not called. As the GtkSpinButton implements the GtkEditable interface, we can also connect to the "changed" signal to get the text typed in by the user immediately. Furthermore, the GtkSpinButton provides the "input" signal, which we can use in some cases to accept numeric text input, such as allowing the user to type "max" or "" to change the actual value. In a similar way, the "output" signal could be used to modify the displayed value. Maybe we want to display "max" when the value is clamped to the upper bound, always add a "+" sign or leading zeros to the displayed numbers, or maybe suppress decimal places when they are zero. Finally, the "wrapped" signal is available for a special action when the value wraps around due to user input.
References:
Grid

The GtkGrid is a container widget that is used to arrange child widgets in a tabular layout with rows and columns. Adjacent cells of the grid can be joined, and the indices of the cells can expand in either a positive or negative direction, allowing easy extension of existing grids in all directions. A new grid container widget is created with the constructor function newGrid(), which needs no arguments. Then we can add child widgets by using the attach() function, which requires a column and a row index and optionally accepts a width and a height parameter for the case that the child should span multiple rows or columns. It is also possible to add a child next to an existing child with the function attachNextTo().
The following example program creates a grid container widget with label and entry child widgets. To keep the example code short, we do not connect the entry widgets to callback functions; you may refer to the Entry section for details about the "activate" signal.
import gintro/[gtk4, gobject, gio]

proc activate(app: gtk4.Application) =
  let window = newApplicationWindow(app)
  window.title = "Employees"
  let grid = newGrid()
  for i, t in ["First Name", "Surname", "Job", "Retire Date"]:
    let l = newLabel(t & ": ")
    l.xAlign = 1
    let e = newEntry()
    grid.attach(l, 0, i)
    grid.attach(e, 1, i)
  window.setChild(grid)
  window.show

proc main =
  let app = newApplication("org.gtk.example")
  app.connect("activate", activate)
  let status = app.run
  quit(status)

main()
We use the attach() function to create the grid cells and insert the child widgets. We use column and row indices, starting at zero and extending to positive values with no gaps. The order in which we add the child widgets is arbitrary, we could use negative indices or skip row or column indices. But we should not try to put more than one child widget into one single grid cell. If multiple widgets should reside in one cell, then we have to first put those child widgets in a box, and then we can add that box to a cell of the grid. We set the alignment value for our label widgets to 1 to make them right aligned.
The GtkGrid widgets implement the GtkOrientable interface, so we can use the function setOrientation() with enum parameters Orientation.horizontal or Orientation.vertical to rotate the grid by 90 degrees.
Using the attachNextTo() function, we can attach child widgets next to already contained children. We have to pass the grid, the new child, the existing child, and an enum PositionType with possible values left, right, top, and bottom. Optionally, we can pass a width and height parameter, which has the value 1 by default. With attachNextTo(), we can also insert new child widgets by possibly shifting existing widgets. The attachNextTo() function allows nil as a third parameter. Then the new widget is inserted at position zero, and the concrete behaviour is determined by the PositionType enum parameter.
We can use the function getChildAt(), passing the cell indices as parameters, to get a child widget, and then possibly call remove() on the result or another known child to remove a widget. The function queryChild() can be used to get the position and spans of child widgets, and with insertRow() and insertColumn(), we can insert whole rows or columns, or remove them with removeRow() and removeColumn(). Cells with children that span multiple cells expand or contract in this case. Finally, there is a function called insertNextTo() that inserts rows or columns next to an existing child widget, with the concrete behavior determined by the PositionType enum (insert to the left, right, upon, or below the existing child). Further function called setRowHomogeneous(), setColumnHomogeneous(), setRowSpacing() and setColumnSpacing() to give all rows or columns the same width or height and a separation are available. Finally, the grid class provides a few functions to modify the baseline position of child widgets, which we will not try to explain here. Maybe later we will manage to give a useful example for different baseline positions.
Note that the GtkGrid supports cursor navigation between cells — in our above example, you can move with the keyboard’s up and down keys between the different entry widgets.
References:
Headerbar
A very simple and useful widget is the GtkHeaderbar, which is often used as a replacement for the ordinary window title and can contain menu buttons or other widgets. The GtkHeaderbar was introduced in GTK3 but strongly modified for GTK4. The GTK developers provide a C program called testheaderbar.c, which demonstrates many different ways in which headerbar widgets can be used. In this section, we will present a common use case where the window title is replaced with the headerbar widget and that headerbar widget contains a menu button. As we have already created a program with a menu button and a popup menu with gactions, we will reuse that code nearly unchanged:
# https://gitlab.gnome.org/GNOME/gtk/-/blob/master/tests/testheaderbar.c
# gcc -Wall testheaderbar.c -o testheaderbar `pkg-config --cflags --libs gtk4`

import gintro/[gtk4, glib, gobject, gio]

const menuData = """
  <interface>
    <menu id="menuModel">
      <section>
        <item>
          <attribute name="label">Normal Menu Item</attribute>
          <attribute name="action">win.normal-menu-item</attribute>
        </item>
        <submenu>
          <attribute name="label">Submenu</attribute>
          <item>
            <attribute name="label">Submenu Item</attribute>
            <attribute name="action">win.submenu-item</attribute>
          </item>
        </submenu>
        <item>
          <attribute name="label">Toggle Menu Item</attribute>
          <attribute name="action">win.toggle-menu-item</attribute>
        </item>
      </section>
      <section>
        <item>
          <attribute name="label">Radio 1</attribute>
          <attribute name="action">win.radio</attribute>
          <attribute name="target">1</attribute>
        </item>
        <item>
          <attribute name="label">Radio 2</attribute>
          <attribute name="action">win.radio</attribute>
          <attribute name="target">2</attribute>
        </item>
        <item>
          <attribute name="label">Radio 3</attribute>
          <attribute name="action">win.radio</attribute>
          <attribute name="target">3</attribute>
        </item>
      </section>
    </menu>
  </interface>"""

proc changeLabelButton(action: gio.SimpleAction; parameter: glib.Variant; label: Label) =
  label.setLabel("Text set from button")

proc normalMenuItem(action: gio.SimpleAction; parameter: glib.Variant; label: Label) =
  label.setLabel("Text set from normal menu item")

proc toggleMenuItem(action: gio.SimpleAction; parameter: glib.Variant; label: Label) =
  let newState = newVariantBoolean(not action.getState.getBoolean)
  action.changeState(newState)
  label.setLabel("Text set from toggle menu item. Toggle state: " & $newState.getBoolean)

proc submenuItem(action: gio.SimpleAction; parameter: glib.Variant; label: Label) =
  label.setlabel("Text set from submenu item")

proc radio(action: gio.SimpleAction; parameter: glib.Variant; label: Label) =
  var l: uint64
  let newState: glib.Variant = newVariantString(parameter.getString(l))
  action.changeState(parameter)
  let str: string = "From Radio menu item " & getString(newState, l)
  label.setLabel(str)

proc activate(app: gtk4.Application) =
  let
    window = newApplicationWindow(app)
    box = newBox(gtk4.Orientation.vertical, 12)
    menubutton = newMenuButton()
    button1 = newButton("Change Label Text")
    actionGroup: gio.SimpleActionGroup = newSimpleActionGroup()
    label: Label = newLabel("Initial Text")
    header = newHeaderBar() (1)

  window.setTitle("Headerbar as titlebar") (2)
  window.setTitlebar(header) (3)
  var action: SimpleAction
  action = newSimpleAction("change-label-button")
  discard action.connect("activate", changeLabelButton, label)
  actionGroup.addAction(action)

  action = newSimpleAction("normal-menu-item")
  discard action.connect("activate", normalMenuItem, label)
  actionGroup.addAction(action)

  var v = newVariantBoolean(true)
  action = newSimpleActionStateful("toggle-menu-item", nil, v)
  discard action.connect("activate", toggleMenuItem, label)
  actionGroup.addAction(action)

  action = newSimpleAction("submenu-item")
  discard action.connect("activate", submenuItem, label)
  actionGroup.addAction(action)

  v = newVariantString("1")
  let vt = newVariantType("s")
  action = newSimpleActionStateful("radio", vt, v)
  discard action.connect("activate", radio, label)
  actionGroup.addAction(action)
  window.insertActionGroup("win", actionGroup)

  label.setMarginTop(12)
  label.setMarginBottom(12)
  box.append(label)
  menuButton.setHalign(gtk4.Align.center)

  var builder = newBuilderFromString(menuData)
  var menuModel: gio.MenuModel = builder.getMenuModel("menuModel")
  var menu = newPopoverMenuFromModel(menuModel)
  menuButton.setPopover(menu)
  # box.append(menubutton) (4)
  menuButton.setIconName("open-menu-symbolic") (5)
  header.packEnd(menuButton) (6)
  button1.setHalign(gtk4.Align.center)
  button1.setActionName("win.change-label-button")
  box.append(button1)
  window.setChild(box)
  window.show

proc main =
  let app = newApplication("org.gtk.example")
  app.connect("activate", activate)
  let status = app.run
  quit(status)

main()
The differences between the code above and the previous gaction.nim example are indeed tiny. We will use annotations to point you to the modification. Some lines of the above code end with a numeric digit included in a circle to mark that line, and we will refer to that location with the same digit here:
| 1 | ceate a new header bar widget |
| 2 | give the window a nice title |
| 3 | set our header widget as the window titlebar |
| 4 | remove or comment out this line as we will add the menu button to our headerbar now |
| 5 | set a nice icon image for our menu button |
| 6 | add the menu button to the headerbar |
Headerbars can contain more widgets, e.g., an "Open" and a "Save" button as used for the Gedit editor, or a text entry widget to support text search. We use the functions packEnd() and packStart() to add widgets to the right or left side of our headerbar.
If you know the headerbar widget already from GTK 3, you may wonder about the gtk_header_bar_set_subtitle() function, which was used in GTK 3 to set subtitles, i.e., the file path below the document name in the gedit editor. This function is not directly provided in GTK 4, but maybe we can insert a vertical box into the headerbar widget that then displays the title and subtitle when desired. But maybe that subtitle is not that useful at all, and its use makes the titlebar really thick.
In the above example, we used the function setIconName() to change the image of our menu button. GTK provides a program called gtk4-icon-browser, which can be used to find icons and their names. And you may consult the references mentioned below.
References:
Dialogs
The dialog box is a graphical control element in the form of a small pop-up window that communicates information to the user and prompts them for a response or selection. Dialog boxes are classified as "modal" or "modeless" depending on whether they block interaction with the software that initiated the dialog. The simplest type of dialog box is the alert, which displays a message and may require an acknowledgment that the message has been read, usually by clicking "OK", or a decision as to whether or not an action should proceed, by clicking "OK" or "Cancel". An example of a plain dialog is the "About" box found in many software programs, which usually displays the name of the program and the version number and may also include a list of the author names and copyright information. Another example of the use of dialog boxes is asking for confirmation for actions that may result in the loss of important data, e.g., closing a program that has an unsaved data buffer or overwriting an existing file.
Non-modal or modeless dialog boxes are used when the requested information is not essential to continue, and the window can be left open while work continues elsewhere. An example of some form of modeless dialogs are toolboxes, which can be separated or detached from the main application window. In general, good software design calls for dialogs to be of the non-modal type where possible, since they do not interrupt the workflow and do not force the user into a particular mode of operation. An example might be a dialog with settings for the current document, e.g., the background and text colors. The user can continue adding text to the main window, whatever color it is, but can change it at any time using the dialog. (This isn’t meant to be an example of the best possible interface for this; often the same functionality may be accomplished by toolbar buttons on the application’s main window.)
Modal dialogs can be classified as system modal, application modal, or document modal. System modal dialogs block the whole GUI, e.g., the shutdown dialog for the computer or serious, unrecoverable system errors. Application modal dialogs block the whole application instance, while document modal dialogs block only the editing of a single document.
In addition to the classic dialog box, GTK provides a set of highly specialized dialogs, the most common and important of which is the well-known GtkFileChooserDialog. Other specialized dialogs are the GtkFontChooserDialog, the GtkColorChooserDialog, the GtkAppChooserDialog, the GtkPageSetupUnixDialog, and the GtkPrintUnixDialog. A simplified variant of the GtkDialog is the GtkMessageDialog, but that one is not available by gobject-introspection and is currently unavailable in the gintro Nim GTK bindings. All these specialized dialogs are subclasses of the GtkDialog class. And finally, there are the GtkNativeDialog with its child GtkFileChooserNative and the GtkAboutDialog, which are not subclasses of the GtkDialog but direct children of the GtkWindow.
You should also note that the existing dialog variants are mostly convenient classes that allow easy creation of dialog boxes with a predefined look that integrates well into the GUI. If you have special needs, you can also create your own custom dialog boxes based on the GtkWindow class.
Dialog box
The GtkDialog is a subclass of the GtkWindow and is used to create popup windows. Dialog boxes are a convenient way to prompt the user for a small amount of input, to display a message, or to ask a question, but their popup behaviour interrupts the user’s workflow and should be used with care.
GTK treats a dialog as a window split vertically. The top section is a GtkBox, which may contain widgets to display information like a label. The bottom area is known as the “action area”, in which buttons or other actionable widgets should be packed, like "OK" and "Cancel" buttons.
We create a new dialog box with a call to the constructor function newDialog(), which takes no arguments. The GTK C API includes the gtk_dialog_new_with_buttons() function, which allows you to set the dialog title, some boolean flags, and add some buttons. However, because that function takes untyped varargs arguments, it is not type safe and cannot be used with gobject-introspection. So with Nim and the gintro bindings, we have to use the newDialog() constructor function and add the title, buttons, other widgets, and flags with separate functions.
A “modal” dialog (that is, one that freezes the rest of the application from user input), can be created by calling the setModal() function with the dialog window as an argument.
We can add various buttons to the dialog window with the function addButton(), to which we pass a label text and a response id. For the response id, we can use one of the predefined negative enums or our own positive integer constants. Clicking one of the buttons will emit the “response” signal, and our connected callback function will receive the matching response id. These buttons also support mnemonics (see Mnemonics in Label Text), so we can use "_Yes" as a label text, and the "Y" will become underlined if we press the ALT key, and ALT + "y" will activate that button.
The predefined response ids of module gtk4 are listed below. The deleteEvent id is passed to the "response" callback when the user clicks not on a button of the dialog box but on the window close symbol or when the ESC key is pressed.
type
  ResponseType* {.size: sizeof(cint), pure.} = enum
    help = -11 # Returned by Help buttons in GTK dialogs
    apply = -10 # Returned by Apply buttons in GTK dialogs
    no = -9 # Returned by No buttons in GTK dialogs
    yes = -8 # Returned by Yes buttons in GTK dialogs
    close = -7 # Returned by Close buttons in GTK dialogs
    cancel = -6 # Returned by Cancel buttons in GTK dialogs
    ok = -5 # Returned by OK buttons in GTK dialogs
    deleteEvent = -4 # Returned if the dialog is deleted
    accept = -3 # Generic response id, not used by GTK dialogs
    reject = -2 # Generic response id, not used by GTK dialogs
    none = -1 # Returned if an action widget has no response id, or if the dialog gets programmatically hidden or destroyed
As the GtkDialog widget class implements the GtkBuildable interface, we can also use XML UI files and the GTK builder for building dialogs. We may add an example for that later.
The example program below creates an application window that contains a button widget. We connect that button with the dialogCb() callback function. That callback creates the dialog, sets some properties of the dialog, and connects the dialog widget to the responseCb() callback function.
import gintro/[gtk4, gobject, gio]

proc responseCb(d: Dialog; id: int) =
  echo "response: ", ResponseType(id)
  d.destroy

proc dialogCb(b: Button; w: ApplicationWindow) =
  let dialog = newDialog()
  dialog.setMargin(10)
  dialog.title = "Dialog"
  dialog.setTransientFor(w)
  # dialog.setDestroyWithParent(true) # not useful for modal dialogs
  dialog.setModal(true)
  let contentArea = dialog.getContentArea
  let msg = newLabel("Do you like Nim and GTK?")
  contentArea.append(msg)
  discard dialog.addButton("Yes", ResponseType.yes.ord)
  discard dialog.addButton("No", ResponseType.no.ord)
  dialog.connect("response", responseCb)
  dialog.show

proc activate(app: gtk4.Application) =
  let window = newApplicationWindow(app)
  window.setMargin(50)
  window.title = "Application Main Window"
  let b = newButton("Open Dialog")
  b.connect("clicked", dialogCb, window)
  window.setChild(b)
  window.show

proc main =
  let app = newApplication("org.gtk.example")
  app.connect("activate", activate)
  let status = app.run
  quit(status)

main()
In the dialogCb() callback function, we call the constructor function newDialog() to create the dialog widget and set the margins and a title for the dialog window. We call setTransientFor() on the dialog widget with our parent window as an argument to bind the dialog window to the parent window. And we call the function setModal() on the dialog widget to freeze the rest of the application from user input. Finally, we add a label to the content area and two buttons to the action area of our dialog, connect it to the response callback function, and call show() on it to display the dialog to the user. The responseCb() callback function prints the response id and calls destroy on the dialog to close its window and return control to the parent application. SetDestroyWithParent(true) can be useful for non-modal dialogs to ensure that the dialog closes automatically when the user closes the parent window.
The GtkDialog class offers some more functions: The response() function with a dialog widget and an response id as an argument can be used to emit the "response" signal, which will then call a connected callback function. When we have an entry widget in our dialog and want to close it when the entry is activated, we may need to use program code to call the response function(). For that, we may connect the entry to its "activate" callback function and call response() on the dialog to close it with a well-defined id result from the "activate" callback function. The function addActionWidget() can be used to add other widget types to the action area of the dialog widget, e.g., an entry widget. That function gets a response id as its last parameter, and that id is passed to the "response" callback function when that widget is activated. The function setDefaultResponse(), called with an response id, sets the last widget in the dialog’s action area with the given response id as the default widget for the dialog. Pressing “Enter” normally activates the default widget. The function setResponseSensitive(), called on the dialog instance with a respose id and a boolean values as parameters, calls setSensitive(widget, setting) for each widget in the dialog’s action area with the given response id. This offers a convenient way to sensitize/desensitize dialog buttons. The function getResponseForWidget() queries the response id of a widget in the action area, and getWidgetForResponse() returns the widget for a given response id. Finally, the functions getContentArea() and getHeaderBar() allow access to the content area box widget and the header bar of the dialog. Note that the headerbar is only used by the dialog if the “use-header-bar” property is true. When we set the “use-header-bar” property of the dialog to true, then the dialog uses a GtkHeaderBar for action buttons instead of the action-area at the bottom. The GtkFileChooserDialog does this. Currently, user-defined GtkDialogs with a HeaderBar are not supported by the gintro bindings because the “use-header-bar” property has to be set on creation of the dialog, but the only available newDialog() constructor does not have a flags argument.[7]
In our example program, we used the “response” signal to connect our response callback function. The response signal is emitted when an action widget is clicked, the dialog receives a delete event, or the application programmer calls the response() function. On a delete event, the response id is ResponseType.deleteEvent. Otherwise, it depends on which action widget was clicked. The dialog widget also supports the "close" signal. The "close" signal is a keybinding signal that gets emitted when the user uses a keybinding to close the dialog. The default binding for this signal is the Escape key.
References:
FileChooserDialog
The GtkFileChooserDialog is a child of the GtkDialog. It works by embedding a GtkFileChooserWidget within a GtkDialog and can display the user’s file system directory structure as trees and lists with file names and other file properties, and it can be used to open or save files interactively.
Note that the displayed screenshot above is taken from an older display with low pixel density and enabled font antialiasing, which generates an unsharp, washed-out look, that some people may prefer.
The GtkFileChooserDialog offers only one single function, which is the constructor for the widget and which is called gtk_file_chooser_dialog_new() in the C API and newFileChooserDialog() for the gintro Nim bindings.
But the file chooser dialog exposes the GtkFileChooser interface, so you can use all of the GtkFileChooser functions on the file chooser dialog as well as those for GtkDialog.
The GtkFileChooser interface provides a set of useful functions for file handling. One of them is called getFile(), and it returns the selected file, which we can use to load or save data directly, as well as the file name and path by calling getPath().
Using the GtkFileChooserDialog is very similar to the use of the GtkDialog: We call the constructor to create the widget and connect it by use of the "response" signal to our callback function, which checks the response id and then opens or saves the file in case of a positive response.
Note that there is also the GtkFileChooserNative dialog available, which may integrate better in the GUI environment when our program is run on Windows or macOS. The GtkFileChooserNative will use a platform-specific dialog if available and fall back to the GtkFileChooserDialog otherwise. As the GtkFileChooserDialog implements the GtkBuildable interface, we could also use XML UI files and the GtkBuilder to create the file chooser dialog.
The following program is a minimal example that lets the user pick a file to open and prints the file system path of the selected file:
import gintro/[gtk4, gobject, gio]

proc fileChooserResponseCb(d: FileChooserDialog; id: int) =
  if ResponseType(id) == ResponseType.accept:
    let file = d.file
    echo file.getPath
  d.destroy

proc dialogCb(b: Button; w: ApplicationWindow) =
  let dialog = newFileChooserDialog("Open File", w, FileChooserAction.open)
  discard dialog.addButton("Open", ResponseType.accept.ord)
  discard dialog.addButton("Cancel", ResponseType.cancel.ord)
  dialog.connect("response", fileChooserResponseCb)
  dialog.show

proc activate(app: gtk4.Application) =
  let window = newApplicationWindow(app)
  window.title = "Application Main Window"
  let b = newButton("Open File Chooser Dialog")
  b.connect("clicked", dialogCb, window)
  window.setChild(b)
  window.show

proc main =
  let app = newApplication("org.gtk.example")
  app.connect("activate", activate)
  let status = app.run
  quit(status)

main()
Our main window contains a single button, for which we connect the "clicked" signal with our dialocCB() callback function. That function calls the constructor function newFileChooserDialog() to create the file chooser dialog widget. We have to pass a title string, the dialog’s parent window, and the intended action as an enum to that function. The C function gtk_file_chooser_dialog_new() has an additional varargs parameter that allows passing a set of button label texts and response ids, but that varargs parameter is not available for bindings generated by gobject-introspection. So we use the function addButton() to add an OK and a Cancel button with matching ids to the dialog, which will then appear in the dialog’s header bar. Finally, we connect a response callback function to the dialog widget. In that callback function, we check the response id and print the path of the selected file.
Instead of using FileChooserAction.open, we can use the enum value "save" to create a dialog to save a file, or the enum value "selectFolder" to allow the user to select an entire directory.
There are various cases in which we may need to use a GtkFileChooserDialog:
-
To select a file for opening, we use FileChooserAction.open
-
To save a file for the first time, we use FileChooserAction.save and may suggest a file name by using setCurrentName()
-
To save a file under a different name, we use FileChooserAction.save and set the existing file as the default with setFile()
-
To choose a folder instead of a file, we may use FileChooserAction.selectFolder
| For most dialog boxes, we can use our own custom response codes rather than the ones in GtkResponseType, but GtkFileChooserDialog assumes that its “accept”-type action, e.g., an “Open” or “Save” button, will have one of the following response codes: ResponseType.accept, ok, yes, apply.[8] To summarize, make sure you use a predefined response code when you use GtkFileChooserDialog to ensure proper operation. |
References:
FontChooserDialog

The GtkFontChooserDialog is used to ask the user for a custom font. We should need it only in rare cases, as generally most widgets should just use the user’s default font. But for applications like text editors, text processing programs, or CAD tools, we should provide a way to change fonts at program runtime, dynamically. The font chooser dialog offers only the constructor function newFontChooserDialog(), but it implements the font chooser interface, which provides the necessary functions to interact with fonts.
Functions such as gtk_widget_override_font() and gtk_widget_modify_font(), which allowed you to set widget fonts directly from a PangoFontDescription, were deprecated in GTK 3 and are no longer available in GTK 4.
So we have to use CSS when we really want to modify widget fonts.
The example program below creates a window with a label and a button. When the button is clicked, a font chooser dialog window pops up, and we can select a different font for the label widget:
import gintro/[gtk4, gobject, gio, pango]

type
  FancyLabel = ref object of Label
    cssPro: CssProvider
    toplevel: ApplicationWindow

proc fontChooserResponseCb(d: FontChooserDialog; id: int; l: FancyLabel) =
  if ResponseType(id) == ResponseType.ok:
    echo "Font: ", d.getFont
    echo "Features: ", d.getFontFeatures
    echo "Size: ", d.getFontSize
    let p: FontDescription = d.getFontDesc
    var data = "label {font-family: " & p.getFamily
    data.add("; font-size: " & $(p.getSize div pango.SCALE) & "pt")
    data.add("; font-style: " & $(p.getStyle))
    data.add("; font-weight: " & $(p.getWeight.ord))
    data.add(";}")
    echo data
    l.cssPro.loadFromData(data)
  d.destroy

proc dialogCb(b: Button; l: FancyLabel) =
  let dialog = newFontChooserDialog("Select a Font", l.topLevel)
  dialog.connect("response", fontChooserResponseCb, l)
  dialog.show

proc activate(app: gtk4.Application) =
  let window = newApplicationWindow(app)
  window.title = "Application Main Window"
  let box = newBox(Orientation.vertical)
  box.setMargin(10)
  let l = newLabel(FancyLabel, "Some fancy text")
  l.cssPro = newCssProvider()
  l.topLevel = window
  let styleContext = l.getStyleContext
  assert styleContext != nil
  addProvider(styleContext, l.cssPro, STYLE_PROVIDER_PRIORITY_USER)
  let b = newButton("Open Font Chooser Dialog")
  b.connect("clicked", dialogCb, l)
  box.append(l)
  box.append(b)
  window.setChild(box)
  window.show

proc main =
  let app = newApplication("org.gtk.example")
  app.connect("activate", activate)
  let status = app.run
  quit(status)

main()
We subclass the GtkLabel widget and add two custom fields, allowing us to store a CssProvider entity and a reference to our application’s main window. We need a reference to the main window in our dialog callback function to set the transient window for the font chooser dialog. In GTK 3, we may have used gtk_widget_get_toplevel() to get that transient window, but that function is not available in GTK 4 any more.
In the activate() procedure, we create our window with a box widget, which contains a label and a button widget. We use the "clicked" signal to connect the button to our dialogCb() callback function, which then creates the font chooser dialog by calling the newFontChooserDialog() constructor. The newFontChooserDialog() constructor gets the dialog’s title and the transient window as parameters.
While we had to add buttons to the file chooser dialog ourselves, the font chooser dialog already contains a "Select" and a "Cancel" button with ids ResponseType.ok and ResponseType.cancel. We use the "response" signal to connect the dialog to our fontChooserResponseCb() callback function, which then calls functions from the font chooser interface to print some information about the selected font and then constructs the CSS string that is used as a parameter for the loadFromData() function. It may be surprising that passing the new CSS string to loadFromData() is enough to update the label widget. Indeed, it is not necessary to first remove the CssProvider, update it, and add it again to the label’s StyleContext.
We style our label widget by using CSS similar to how we did it earlier for a Button widget. For that, we have to create a CssProvider entity and attach it to our label’s StyleContext. We keep a reference to that CssProvider entity in a field of our label widget so that we can call l.cssPro.loadFromData(data) in the fontChooserResponseCb() callback function to set the desired font attributes. As the font chooser dialog does not give us appropriate CSS strings to set the font directly, we have to first call getFontDesc() on the dialog object to get the PangoFontDescriptor, and then call various functions like getFamily() on the PangoFontDescriptor instance to get the needed data. We then construct a string containing all required CSS properties from that data and use loadFromData() to pass the data to the CssProvider entity. Such a constructed CSS string may look like
label {font-family: Source Serif Pro; font-size: 16pt; font-style: italic; font-weight: 700;}
Later in the book, we will show how we can style the font of a GtkSourceView widget of a simple text editor program and how we can store the selected font permanently by use of GSettings.
References:
Drag and Drop (DND)
The drag-and-drop gesture is used to transfer data between different application programs or within different areas of a single app: We click with the mouse on a symbol representing some data, move the mouse pointer while holding a mouse button pressed, and finally release the mouse button when the mouse pointer hovers over a destination area like a window or a widget. This way, we can easily move or copy data. The DND gesture is most often used for transferring whole files or text segments (strings), but it can also be used to move widgets, rows of a list display, or other entities. Using DND is not very difficult in GTK4; the two first links at the bottom of this section give a short introduction.
Simple drag sources for text strings and files
For our first tiny example, we will create a drag text source so that you can drag a textual message from our app to another app accepting text, e.g., the Gedit text editor:
import gintro/[gtk4, gdk4, gobject, gio, glib]

proc toStringVal(s: string): Value =
  discard result.init(gStringGetType())
  result.setString(s)

proc onDragPrepare(source: DragSource; x, y: float; b: Button): gdk4.ContentProvider =
  #result = newContentProviderForValue(toStringVal("Also some plain text"))
  result = newContentProviderForBytes("text/plain", glib.newBytes("Some text"))

proc printMsg(widget: Button) =
  echo("You can click or drag me")

proc activate(app: gtk4.Application) =
  let window = newApplicationWindow(app)
  window.title = "Drag source test"
  window.defaultSize = (200, 200)
  let box = newBox(Orientation.horizontal)
  window.setChild(box)
  let button = newButton("Drag me into gedit")
  button.connect("clicked", printMsg)
  let source = newDragSource()
  source.connect("prepare", onDragPrepare, button)
  button.addController(source)
  box.append(button)
  window.present

proc main =
  let app = newApplication("org.gtk.example")
  app.connect("activate", activate)
  discard app.run

main()
In the example above, we create a drag source object, connect it to the prepare signal, and finally use the function addController() to connect our button widget with our drag source. In the onDragPrepare() callback function. we have to create a content provider object filled with our text string. For the textual data type, we can use newContentProviderForValue(), to which we pass the text string as a GValue, or we can alternatively use newContentProviderForBytes(), which accepts as arguments a string specifying the data type, and the actual textual message wrapped in the GBytes data type. You may compile and run the above example, and then launch an additional Gedit instance. Now you can grab the button widget in our app and drag it into the Gedit window — a copy of the text should appear in Gedit. You can repeat this action multiple times. CAUTION: When you click the button, so that the message "You can click or drag me" is printed in the terminal window from where you have launched our app, the drag action stops working. We have yet to investigate the reason for this, maybe it is a bug in current GTK4. Actually, most of the time we would not connect drag sources to button widgets, but to other widget types.
Instead of dragging text strings, we may intend to pass whole named files to a destination app that can process them, e.g., the Gedit editor. Our program from above can be easily modified to do that, but we have to know which data types we have to use. To have a source file for testing, we execute this command first:
echo -e "This is a short \ntext file" > /tmp/myuselesstextfile.txt
cat /tmp/myuselesstextfile.txt
Our minimal app with a file drag source may look like this one now:
import gintro/[gtk4, gdk4, gobject, gio, glib]

proc toGFileVal(s: string): Value =
  discard result.init(g_type_from_name("GFile"))
  let f = newGFileForPath(s)
  result.setObject(f)

proc onDragPrepare(source: DragSource; x, y: float; b: Button): gdk4.ContentProvider =
  #result = newContentProviderForValue(toGFileVal("/tmp/myuselesstextfile.txt"))
  result = newContentProviderForBytes("text/uri-list", glib.newBytes("file:///tmp/myuselesstextfile.txt"))

proc printMsg(widget: Button) =
  echo("You can click or drag me")

proc activate(app: gtk4.Application) =
  let window = newApplicationWindow(app)
  window.title = "Drag source test"
  window.defaultSize = (200, 200)
  let box = newBox(Orientation.horizontal)
  window.setChild(box)
  let button = newButton("Drag me into gedit")
  button.connect("clicked", printMsg)
  let source = newDragSource()
  source.connect("prepare", onDragPrepare, button)
  button.addController(source)
  box.append(button)
  window.present

proc main =
  let app = newApplication("org.gtk.example")
  app.connect("activate", activate)
  discard app.run

main()
We have two options to specify the drag file source. We can use newContentProviderForBytes("text/uri-list", glib.newBytes("file:///tmp/myuselesstextfile.txt") in the drag signal callback function, or we can use newContentProviderForValue(toGFileVal("/tmp/myuselesstextfile.txt")). The first variant is the simplest, but we have to know that the string specifying the file data type is called "text/uri-list" and that we have to prepend the actual absolute file path with the string "file://". For the second solution, we have to create a GValue type with GFile content. Again, when we first click our button, the drag operation does not work any more. You can find all the details for the DND operation in the API documentation for the GtkDragSource https://docs.gtk.org/gtk4/class.DragSource.html. You should also consult the API docs for the GtkContentProvider at https://docs.gtk.org/gdk4/class.ContentProvider.html to learn about all the details and further options.
Drag destinations for text strings or files
For creating an app that accepts dropped data, we have to create a GtkDropTarget, connect its drop signal to a callback function, and finally attach the drop target to a widget. We use a GtkTextView embedded in a GtkScrolledWindow for the final destination because we want to be able to receive longer text fragments:
import gintro/[gtk4, gdk4, gobject, gio, glib]

proc onDrop(self: DropTarget; val: Value; x, y: float; view: TextView): bool =
  assert(val.gtype == gStringGetType())
  let txt = val.getString
  let buffer = view.getBuffer
  buffer.setText(txt, txt.len)
  true

proc activate(app: gtk4.Application) =
  let window = newApplicationWindow(app)
  window.title = "Text view, drop some text here"
  window.defaultSize = (200, 200)
  let scrolledWindow = newScrolledWindow()
  let view = newTextView()
  window.setChild(scrolledWindow)
  scrolledWindow.setChild(view)
  let target = newDropTarget(gStringGetType(), {DragFlag.copy})
  target.connect("drop", onDrop, view)
  view.addController(target)
  window.present

proc main =
  let app = newApplication("org.gtk.example2")
  app.connect("activate", activate)
  discard app.run

main()
We create the drop target with the function newDropTarget(), which gets as a first parameter the GType of the expected data and as a second argument a drag flag enumeration, which may have values like copy or move to indicate if we intend a copy or a move operation. Our drop callback function receives the data as a GValue. The provided x, y parameters can be used to test if the drop operation occurred in the intended area. If the drop operation is accepted, the callback should return true, and false otherwise. In our callback function, we use getString() to extract the textual data from the GValue parameter and set that text as the content of the buffer of the text view to display it. Note that we can access the gtype field of the GValue parameter to verify that the actual data type matches our expectation. To test this app, you may compile and run it, and then launch a Gedit instance where you type in some text. Then you can select a text fragment in the editor and drag it into the window of our app. Or, you may launch our first app of this section, which can also be used as a drag source. But in this case, you have to ensure that the passed string for newApplication() of both of our apps differs, as otherwise the second launched program is identical to the first one, and our tests would fail obviously.
Finally, we can modify our drop target example app to accept a GFile instance:
import gintro/[gtk4, gdk4, gobject, gio, glib]

proc onDrop(self: DropTarget; val: Value; x, y: float; view: TextView): bool =
  assert(val.gtype == g_type_from_name("GFile"))
  var contents: string
  var etagOut: string
  var length: uint64
  let f: GFile = cast[GFile](val.getObject)
  if loadContents(f, cancellable = nil, contents, length, etagOut):
    assert(length.int == contents.len)
    echo "etag: ", etagOut
    let buffer = view.getBuffer
    buffer.setText(contents, contents.len)
  true

proc activate(app: gtk4.Application) =
  let window = newApplicationWindow(app)
  window.title = "Text view, drop some text here"
  window.defaultSize = (200, 200)
  let scrolledWindow = newScrolledWindow()
  let view = newTextView()
  window.setChild(scrolledWindow)
  scrolledWindow.setChild(view)
  let target = newDropTarget(g_type_from_name("GFile"), {DragFlag.copy})
  target.connect("drop", onDrop, view)
  view.addController(target)
  window.present

proc main =
  let app = newApplication("org.gtk.example2")
  app.connect("activate", activate)
  discard app.run

main()
The first argument of newDropTarget() is now the GFile type, and in the onDrop() callback function, we use val.getObject() to extract the GFile object from the GValue container. In this situation, we can’t avoid the ugly and dangerous downcast. To test our app, you can compile and run it, and then drag files from the Gnome file browser (formerly called Nautilus) into our app.
GTK4 offers drag and drop operations for some more data types, and you may connect to a few additional signals, e.g., to set the icon that is displayed during the drag operation, or to do some cleanup tasks after the operation. Of course, DND can be used inside a single app, e.g., to copy files from a ListView to other widgets like a TextView or a DrawingArea.
References:
ListView, ColumnView, GridView and DropDown
The ListView and ColumnView widgets are the modern GTK4 replacements for the old GtkTreeView widget. The DropDown widget can be used to replace the old GtkComboBox (text) widget, and the GridView allows widgets to be displayed in the form of a floating grid, such as a color palette or a set of pictograms. All these widgets can be used to display a number of similar elements, like a list of names, numbers, or files. The two main advantages of these widget classes over the old GtkTreeView are that they can have most ordinary widgets as child elements, and that they work well even with very large numbers of child rows. This last property is based on the fact that these widgets create only as many widgets as are needed for the current view and reuse these widgets to display all the data. A disadvantage of these widgets compared to the traditional GtkTreeView is that some of the child widgets may not be suitable for building compact presentations. For example, the SpinButton and the ComboBoxText are bulky by design, and do not integrate well in compact lists. But that may change with new GTK4 releases, maybe with CSS styling. The same is true for the Entry widget, but we can use the more compact GtkText or the EditableLabel widget instead. t is unclear whether these widgets can completely replace the GtkTreeView with its support for deeply nested tree-like displays with expandable views, but for simple views, they should suffice. These widgets also support sorting and drag-and-drop operations.
The ListView and ColumnView widgets have some similarity with the GtkBox and GtkGrid containers — Boxes and Grids are most often used for static displays with a small number of children, while ListView and ColumnView both support addition and deletion of children well and should work fine with thousands of data items.
The ListView is used to display simple lists like file names or compound objects like a name and a check box. The ColumnView can display data with multiple formatted columns, where each column can contain text strings or arbitrary widgets like check boxes, switches, or spin buttons. Each column in a column view can have a heading. The DropDown widget is finally a widget, which on click pops up a list from which the user can select an item, like a filename, a style, or a drawing mode.
All these widgets are designed to support a variant of the model–view–controller (MVC) software architectural pattern, which separates the data storage, the actual display, and possible controllers to modify the data. The aforementioned widgets construct a view out of a collection of ordinary widgets and make use of various model objects that can store data. The models are subclasses of the GObject class. GTK4 provides some ready-to-use models to use, like the GtkStringObject, which has a single string property. When we need more complex models, we must subclass the GObject data type ourselves, which is simple in C but not yet supported by the gintro Nim bindings. But for Nim, we have other ways to bind data to widgets, so this is not a very serious restriction, and later gintro versions may support C-like GObject subclassing, including the creation of new properties.
For initially creating the set of child widgets that are needed to display the currently visible data and for connecting the data stored in a model (or elsewhere) with the widgets used for the display, GTK4 uses a special data type called GtkFactory.
In C, creating a Listview instance looks like
view = gtk_list_view_new (model, factory);The first parameter, the model, is a GListModel containing GObjects or GObject subclasses like GtkStringObject containing some data. This is the first significant difference between GtkTreeview and GtkTreeModels directly containing basic types. For some simple cases, GTK provides ready-made models, such as GtkStringList.
The list item factory is a simple tool that generates all of the row widgets required for the actual display and connects the widgets to the model items so that the correct data is always displayed.
GTK provides two variants of a list item factory: the GtkSignalListItemFactory, for which we have to provide only a few callback functions, and the GtkBuilderListItemFactory, which works with XML UI files. We will start with the GtkSignalListItemFactory, which is easier to understand.
In C we would create an instance of a GtkSignalListItemFactory by a plain call of
factory = gtk_signal_list_item_factory_new ();and then connect its signals, at least the "setup" and "bind" signals, to appropriate callback functions. The "setup" signal is emitted when the factory needs to create a new row widget, and "bind" is emitted when a row widget needs to be connected to an item from the model.
The ListView will create a few more rows than it needs to fill its visible area, to get a better estimate for the size of the scrollbars, and to have some "buffer" for when we decide to scroll the view. When we scroll the list, then the factory will not create new widgets, but only reconnect visible widgets to new data.
A few ListView examples
We will start with a very simple ListView example, which only displays a numbered list of strings:
import gintro/[gtk4, gobject, gio, glib]

proc onSetup(f: SignalListItemFactory; item: Object) =
  let l = newLabel()
  cast[ListItem](item).setChild(l)

proc onBind(f: SignalListItemFactory; item: Object) =
  let item = cast[ListItem](item)
  let l = Label(item.getChild())
  let strObj = cast[StringObject](item.getItem)
  l.text = $item.getPosition & " " & strObj.getString

proc createList(): ListView =
  let sl = newStringList("zero", "one", "two", "three", "four", "five", "six", "seven")
  let ns = newNoSelection(cast[ListModel](sl))
  let factory = newSignalListItemFactory()
  factory.connect("setup", onSetup)
  factory.connect("bind", onBind)
  return newListView(ns, factory)

proc activate(app: Application) =
  let window = newApplicationWindow(app)
  window.title = "Listview"
  window.defaultSize = (200, 200)
  let sw = newScrolledWindow()
  let lv = createList()
  sw.setChild(lv)
  window.setChild(sw)
  window.present

proc main =
  let app = newApplication("org.gtk.example")
  app.connect("activate", activate)
  discard app.run

main()
The list-like widgets are generally put into a ScrolledWindow, so we create a new ScrolledWindow instance in the activate proc. Then we call our own createList proc, which returns a ListViewWidget, which we can then set as child of the ScrolledWindow instance. In the createList() proc, we intend to call newListView() to create a ListView widget instance, which we can return. For this, we need a GtkSelectionModel and a GtkListItemFactory. With a call to newNoSelection(), we create a GtkSelectionModel instance, which takes a ListModel as a parameter and returns a GtkSelectionModel—in this case, a model that does not allow row selection. A GtkStringList is a list model that wraps an array of strings. We can pass the initial strings as parameters to newStringList(), or we can use functions like append() and remove() to add or remove single strings. The cast of our string list to a ListModel instance is currently necessary — the actual reason for this is that newNoSelection() is a proc of the gio module, while the GtkNoSelection data type is defined in the gtk4 module. So the gintro bindings currently do not match these types automatically. The proc newSignalListItemFactory() takes no parameters, and its actual name is a result of the fact that a similar proc exists that works with XML UI files; we will give an example of that in one of the following sections. The factory instance supports a set of signals — the most important of which are the "setup" and "bind" signals. The "setup" signal is very easy to understand; it is used with a callback proc that has to provide the widgets that are needed to display single rows of our list view. Our onSetup() proc just creates a new label widget and calls item.setChild to set it as a child widget of a list item. The onSetup() proc is automatically called whenever GTK needs more widgets to display the actual visible data, e.g., when the initial list view is created or when we resize the listview widget. Adding more strings to our list or scrolling the list typically does not call onSetup, as this does not increase the number of needed widgets — the visible widgets are just filled with new data when we scroll the list. This action is carried out during the onBind() procedure. Our onBind() proc first extracts the child of the actual list item, which is a Label in our case. Then we call item.getItem() to extract the wrapped string object, and finally we use the string of this string object to set the label text to display. Additionally, we use item.getPosition() to attach a row number to the label text.
Typically, our rows will be more complicated than a single label. We may create complex widgets and group them in containers as needed.
When our "bind" handler connects to signals on the item or does other things that require cleanup, then we can use the "unbind" signal to do that cleanup. The "setup" signal has a similar counterpart called "teardown".
The builder way
In the previous example, we used a SignalListItemFactory and connected the "setup" and "bind" handlers manually.
GTK also offers a BuilderListItemFactory, which works with XML UI files and does not require us to connect signals to handler callbacks.
Mr. Clasen has described the method in his blog post as follows:
Our "setup" handler is basically a recipe for creating a small widget hierarchy. GTK has a more declarative way of doing this: GtkBuilder UI files. That is the way GtkBuilderListItemFactory works: you give it a ui file, and it instantiates that ui file whenever it needs to create a row.
ui = "<interface><template class="GtkListItem">...";
bytes = g_bytes_new_static (ui, strlen (ui));
gtk_builder_list_item_factory_new_from_bytes (scope, bytes);
And he provides an example of an XML UI file that we can use for our plain list:
import gintro/[gtk4, gobject, gio, glib]

const UI = """
<interface>
  <template class="GtkListItem">
    <property name="child">
      <object class="GtkLabel">
        <binding name="label">
          <lookup name="string" type="GtkStringObject">
            <lookup name="item">GtkListItem</lookup>
          </lookup>
        </binding>
      </object>
    </property>
  </template>
</interface> """

proc createList(): ListView =
  let sl = newStringList("zero", "one", "two", "three", "four", "five", "six", "seven")
  let ns = newNoSelection(cast[ListModel](sl))
  let bytes = newBytes(UI)
  let factory = newBuilderListItemFactoryFromBytes(BuilderScope(nil), bytes)
  return newListView(ns, factory)

proc activate(app: Application) =
  let window = newApplicationWindow(app)
  window.title = "Listview"
  window.defaultSize = (200, 200)
  let sw = newScrolledWindow()
  let lv = createList()
  sw.setChild(lv)
  window.setChild(sw)
  window.present

proc main =
  let app = newApplication("org.gtk.example")
  app.connect("activate", activate)
  discard app.run

main()
If you should intend to use this UI file approach, you may read the blog post of M. Clasen linked below — it would not make much sense to cite it completely here, and we are not able to explain it in a simpler way.
Special list models, and closures in XML UI files
Beside the simple GtkStringList, GTK provides some more implementations of the GListModel, like the GtkDirectoryList, which is used to display lists of files in a directory. We can find a C example for the use of a GtkDirectoryList in section 26 of the GTK4 C tutorial by Mr. ToshioCP. The provided C example uses a closure tag in the XML UI file, which instructs the GtkBuilder to call a C function defined in our source file. Unfortunately, handling such closure tags is not really easy for our Nim programs, for various reasons: GTK calls the closure with the C calling convention with the original (unwrapped) data types, while our Nim procs work generally with proxy data types. An additional problem is that Nim does name mangling, so we have to ensure that the C linker can find our closure proc. The following program shows a simple but ugly solution. It is a straightforward conversion of Mr. ToshioCP’s C tutorial:
import gintro/[gtk4, gobject, gio, glib]

proc getFileName(item: ptr ListItem00; info: ptr FileInfo00) : ptr cchar {.cdecl, exportc, dynlib.} =
  if info == nil:
    return
  var fi = FileInfo(impl: info)
  fi.ignoreFinalizer = true
  if not typeCheckInstanceIsA(fi, gfileInfoGetType()):
    return nil
  let h = fi.getName
  return cast[ptr cchar](g_strdup(h))

const UI = """
<interface>
  <template class="GtkListItem">
    <property name="child">
      <object class="GtkLabel">
        <binding name="label">
          <closure type="gchararray" function="getFileName">
            <lookup name="item">GtkListItem</lookup>"
          </closure>
        </binding>
      </object>
    </property>
  </template>
</interface> """

proc createList(): ListView =
  let file = newGFileForPath(".")
  let dl = newDirectoryList("standard::name", file)
  let ns = newNoSelection(cast[ListModel](dl))
  let bytes = newBytes(UI)
  let factory = newBuilderListItemFactoryFromBytes(BuilderScope(nil), bytes)
  return newListView(ns, factory)

proc activate(app: Application) =
  let window = newApplicationWindow(app)
  window.title = "Listview"
  window.defaultSize = (200, 200)
  let sw = newScrolledWindow()
  let lv = createList()
  sw.setChild(lv)
  window.setChild(sw)
  window.present

proc main =
  let app = newApplication("org.gtk.example")
  app.connect("activate", activate)
  discard app.run

main()
In our createList() proc, we call newDirectoryList() to create a GtkDirectoryList. The UI file contains the entry "<closure type="gchararray" function="getFileName">" which instructs the GtkBuilder to call a function with the name "getFileName". To allow GTK to directly call this function, we must annotate our procedure with.cdecl, exportc, dynlib. This ensures that the C calling convention is available for this function and that the original file name is visible for the C linker. As parameters of the function, we have to use the original GTK data types, which have the 00 postfix for the gintro bindings. While the gintro bindings contain all the functions that work on the unwrapped data types, these functions are not exported. For this reason we create a faked proxy object, which we then can pass to getName() to get the file name. We create a FileInfo proxy object, with its impl field pointing to the original GTK file info, and we set the ignoreFinalizer field of our proxy object to true, as the file info is owned by GTK, so the Nim memory management should not free it. Finally, as GTK will free the returned C string, we use g_strdup() to create a copy of our Nim string, which GTK is allowed to free.
When we compile our program, we have to specify "--passL:-rdynamic" so that the C linker finds our getFileName() proc:
nim c --passL:-rdynamic listview3.nim # or
nim c --passL:-export-dynamic listview3.nim
When we run our program from the command line, we should get a listing of the files in the current directory. Of course, this example is very ugly. But it shows you some ways to do low-level C-like stuff with the gintro Nim bindings. When we find out that we really need these closure tags, we may try to write some Nim macros to encapsulate the ugly low-level details.
Editable cells
Sometimes we may use a ListView widget not only to display data but also to allow the user to edit rows. The rows may be only string widgets, or maybe compound elements containing CheckBoxes or SpinButtons, for example. When we intend to allow the user to modify the state of widgets in a row of a ListView widget, then we have to remember the fact that the number of widgets is generally smaller than the size of the actual data set may require, as widgets are reused when we scroll the content of the ListView widget. So, there is no fixed relation between widgets used to display the data and the ListModel storing the data. For example, when we use a GtkEntry in the ListView to display editable strings, it is not trivial to store the changed content in the ListModel, as there may be no permanent relation between an entry widget and a string stored in the model. In one of the next sections, when we introduce the GtkColumnView widget, we will show one possible solution to this problem: We assign integer numbers to the row widgets whenever they are instantiated or recycled, and with these id numbers, it is possible to store the modified data in the correct index position in the ListModel or another storage. In this section, we will use a different approach: Property binding. GObjects and derived objects like widgets, can have properties (attributes) that we can query and set. And GObject subclasses support binding a property of one object instance to another one, even when the two instances have a different data type and when the property data types differ. In this section, we will create a ListView widget with rows of editable strings, displayed with GtkEntry widgets, and stored in a ListModel. The basic idea is that we use property binding between the text property of the GtkEntry and a GObject subclass that is stored in the ListModel. A list model containing GtkStringObjects may look like the ideal storage, but unfortunately, the GtkStringModel has a string property that is read-only. So we cannot bind the text property of a GtkEntry to the string property of the GtkStringObject entity. We would have to create a new GObject subclass with a read/write string property for our task. Unfortunately, the gintro bindings do not currently support the creation of new GObjects. So, to show a basic sketch of how property binding may be used for editable ListViews, we just use an arbitrary existing GObject subclass with a read/write text property. The GtkLabel is a possible candidate:
import gintro/[gtk4, gobject, gio, glib]

type MyEntry = ref object of Entry
  b: Binding

proc onSetup(f: SignalListItemFactory; item: Object) =
  let l = newEntry(MyEntry)
  cast[ListItem](item).setChild(l)

proc onBind(f: SignalListItemFactory; item: Object) =
  let item = cast[ListItem](item)
  let l = MyEntry(item.getChild())
  let strObj = cast[Label](item.getItem)
  l.text = strObj.getText
  l.b = bindProperty(l, "text", strObj, "label", {})# {syncCreate})

proc onUnbind(f: SignalListItemFactory; item: Object) =
  let item = cast[ListItem](item)
  let l = MyEntry(item.getChild())
  if l.b != nil:
    l.b.unbind

proc createList(): ListView =
  #let gtype = gObjectGetType()
  let gtype = gtkLabelGetType()
  var listStore = gio.newListStore(gtype)
  for i in 0 .. 255:
    let o = newLabel("Label " & $i)
    listStore.append(o)
  let model = cast[SelectionModel](newNoSelection(cast[ListModel](listStore)))
  let factory = newSignalListItemFactory()
  factory.connect("setup", onSetup)
  factory.connect("bind", onBind)
  factory.connect("unbind", onUnbind)
  return newListView(model, factory)

proc activate(app: Application) =
  let window = newApplicationWindow(app)
  window.title = "Editable Listview"
  window.defaultSize = (200, 200)
  let sw = newScrolledWindow()
  let lv = createList()
  sw.setChild(lv)
  window.setChild(sw)
  window.present

proc main =
  let app = newApplication("org.gtk.example")
  app.connect("activate", activate)
  discard app.run

main()
In the above example’s createList() procedure, we create a ListStore with GtkLabel GType and append 256 numbered labels to it. We use such a large number of entries, so that we can really verify that the widget recycling process works. With only a few dozen list entries, GTK may just allocate all the needed widgets at startup, and never do some rebinding of data to widgets. We connect the "setup", "bind" and "unbind" signals to our SignalListItemFactory. The "setup" handler just creates new GtkEntry widgets and sets that widget as a child of the ListItem. The "bind" handler does two things: It sets the text string of the label wrapped in the ListItem as the text of the entry widget, and it binds the text property of the entry to the string property of the label. The first action is necessary to fill the text buffers of the GtkEntry widgets at program startup, and the second action ensures that the data stored in the list model gets updated whenever an entry widget is modified. As the GtkEntry widgets are recycled, it is necessary to undo the property binding before the widgets can be reused. This unbind operation is done in our onUnbind() proc. Of course, using GtkLabels as children of the ListModel is a stupid idea, as a GtkLabel is a heavy entity. But at least you get the idea. Note: When we run this program and scroll the list, we currently get some GTK warnings like "GtkText - unexpected blinking selection. Removing" Currently, we have no idea if this indicates a bug in our app — maybe it is a result of misusing the label instances for data storage.
GtkDropDown
The DropDown widget is a replacement for the old GtkComboBox(text). It looks like a plain button and pops up a list of choices, from which the user can select. Internally, the DropDown works similar to the GtkList, using a ListModel and a factory. In this section, we will only present an example for the simplest use of a DropDown widget, with a set of textual strings from which the user can pick one. This should be the typical use of the widget, and we do not have to provide an explicit factory or "setup" and "bind" callbacks, as the widget already has a default factory implementation. To make this simple DropDown widget, simply call newDropDownFromStrings().
This widget has no special signals that get emitted when the user makes a selection, so we have to use the general "notify" signal for widget properties, which was already introduced earlier in the book. In our example, we connect to the "notify::selected" signal. "Selected" is a numerical property, specifying the ordinal value of the selected item. We may have connected our callback handler to the "notify::selected-item" signal instead — selected-item is a property for the selected item. In the callback, we use getSelectedItem() to get the item from the model, and we use the GTK function typeCheckInstanceIsA() to ensure that the item is really a GtkStringObject. Finally, we have to cast the item from the original GObject type to the GtkStringObject type, before we can call getString() on the item to read out the wrapped string. Note that in this case an ugly cast is really needed; a Nim test like "o of StringObject" or a Nim type conversion like StringObject(o) would not work because GTK stores the items as plain GObjects internally (so getSelectedItem() always returns a plain GObject).
import gintro/[gtk4, gobject, gio, glib]

proc notify(dd: DropDown; paramSpec: ParamSpec; l: Label) =
  echo "notify:", paramSpec.getName
  let o = dd.getSelectedItem
  assert(typeCheckInstanceIsA(o, gtkStringObjectGetType()))
  let item = cast[StringObject](o)
  l.text = "Selected: " & item.getString

proc activate(app: Application) =
  let window = newApplicationWindow(app)
  window.title = "DropDown"
  window.defaultSize = (200, 200)
  let box = newBox(Orientation.vertical)
  let label = newLabel("Initial Text")
  let dd = newDropDownFromStrings("zero", "one", "two", "three", "four", "five", "six", "seven")
  let m = dd.getModel # get the model and
  cast[gtk4.StringList](m).append("many") # add more items
  # dd.showArrow = false # supress the downwards pointing  arrow
  # dd.connect("notify", notify, label) # all properties
  dd.connect("notify::selected-item", notify, label)
  box.append(label)
  box.append(dd)
  window.setChild(box)
  window.present

proc main =
  let app = newApplication("org.gtk.example")
  app.connect("activate", activate)
  discard app.run

main()
After creating the initial list with newDropDownFromStrings(), we can always use getModel() to get the list model and then call append() to append more strings. In order to hide the arrow symbol to the right of the button text, call setArrow(false) on the drop-down widget.
References:
GtkColumnView
This section is still a work in progress, but at least we have already a working ColumnView example with editable rows:
import gintro/[gtk4, gobject, gio, glib, cairo]
import times

var qt = "GTKLV" & $epochTime()
if g_quark_try_string(qt) != 0:
  qt = "NGIQ" & $epochTime()
let CVquark: int = quark_from_static_string(qt) # caution, do not use name Quark!

const
  LayerNames = ["Ground", "Power", "Signal", "Remark"]

type
  LayerRow = object
    name: string
    style: string
    group: string
    locked: bool
    visible: bool

var
  layers = newSeq[LayerRow](LayerNames.len)

proc initLayers =
  for i, el in mpairs(layers):
    el.name = LayerNames[i]
    el.style = "default"
    el.group = "G"
    el.visible = true

type
  ColumnViewGObject = ref object of gobject.Object

proc onSelectionChanged(self: SelectionModel; pos: int; nItems: int) =
  echo "onSelectionChanged"
  #echo pos, nItems
  #echo typeof(cast[SingleSelection](self).getModel)
  echo "bbb ", self.getSelection.maximum

proc onLayerNameChanged(w: Text) =
  let row = cast[int](w.getQdata(CVquark))
  layers[row].name = w.text

proc onStyleNameChanged(w: Text) =
  let row = cast[int](w.getQdata(CVquark))
  layers[row].style = w.text

proc onGroupNameChanged(w: Text) =
  let row = cast[int](w.getQdata(CVquark))
  layers[row].group = w.text

proc onLockedChanged(w: CheckButton) =
  let row = cast[int](w.getQdata(CVquark))
  layers[row].locked = w.active
  echo layers

proc onVisibilityChanged(w: CheckButton) =
  let row = cast[int](w.getQdata(CVquark))
  layers[row].visible = w.active

proc draw(d: DrawingArea; cr: cairo.Context; w, h: int) =
  echo "draw", w, " ", h
  cr.setSource(1, 0, 0)
  cr.paint

proc setup0(f: SignalListItemFactory; item: Object) =
  let l = newLabel()
  cast[ListItem](item).setChild(l)

proc setup1(f: SignalListItemFactory; item: Object) =
  let l = newText()
  l.connect("activate", onLayerNameChanged)
  cast[ListItem](item).setChild(l)

proc setup2(f: SignalListItemFactory; item: Object) =
  let l = newText()
  l.connect("activate", onStyleNameChanged)
  cast[ListItem](item).setChild(l)

proc setup3(f: SignalListItemFactory; item: Object) =
  let l = newText()
  l.connect("activate", onGroupNameChanged)
  cast[ListItem](item).setChild(l)

proc setup4(f: SignalListItemFactory; item: Object) =
  let l = newCheckButton()
  l.connect("toggled", onLockedChanged)
  cast[ListItem](item).setChild(l)

proc setup5(f: SignalListItemFactory; item: Object) =
  let l = newCheckButton()
  l.connect("toggled", onVisibilityChanged)
  cast[ListItem](item).setChild(l)

proc setup6(f: SignalListItemFactory; item: Object) =
  let l = newDrawingArea()
  l.setContentWidth(4)
  l.setContentHeight(4)
  l.setDrawFunc(draw)
  cast[ListItem](item).setChild(l)

proc bind0(f: SignalListItemFactory; item: Object) =
  let item = cast[ListItem](item)
  let l = Label(item.getChild())
  l.text = $item.getPosition

proc bind1(f: SignalListItemFactory; item: Object) =
  let item = cast[ListItem](item)
  let l = Text(item.getChild())
  l.setQdata(CVquark, cast[pointer](item.getPosition))
  l.text = layers[item.getPosition].name

proc bind2(f: SignalListItemFactory; item: Object) =
  let item = cast[ListItem](item)
  let l = Text(item.getChild())
  l.setQdata(CVquark, cast[pointer](item.getPosition))
  l.text = layers[item.getPosition].style

proc bind3(f: SignalListItemFactory; item: Object) =
  let item = cast[ListItem](item)
  let l = Text(item.getChild())
  l.setQdata(CVquark, cast[pointer](item.getPosition))
  l.text = layers[item.getPosition].group

proc bind4(f: SignalListItemFactory; item: Object) =
  let item = cast[ListItem](item)
  let l = CheckButton(item.getChild())
  l.setQdata(CVquark, cast[pointer](item.getPosition))
  l.setActive(layers[item.getPosition].locked)

proc bind5(f: SignalListItemFactory; item: Object) =
  let item = cast[ListItem](item)
  let l = CheckButton(item.getChild())
  l.setQdata(CVquark, cast[pointer](item.getPosition))
  l.setActive(layers[item.getPosition].visible)

proc bind6(f: SignalListItemFactory; item: Object) =
  let item = cast[ListItem](item)
  let l = DrawingArea(item.getChild())

# e.g. double click on item
proc onColumnViewActivate(cv: ColumnView, pos:int) =
  echo "onColumnViewActivate"

proc createLayersWidget: ScrolledWindow =
  initLayers()
  let cv = newColumnView()
  cv.setHexpand
  #cv.setSingleClickActivate(false)
  cv.addCssClass("data-table") # [.column-separators][.rich-list][.navigation-sidebar][.data-table]

  let c0 = newColumnViewColumn()
  c0.title = "#"
  let f0 = newSignalListItemFactory()
  f0.connect("setup", setup0)
  f0.connect("bind", bind0)
  c0.setFactory(f0)
  cv.appendColumn(c0)

  let c1 = newColumnViewColumn()
  c1.title = "Layer"
  let f1 = newSignalListItemFactory()
  f1.connect("setup", setup1)
  f1.connect("bind", bind1)
  c1.setFactory(f1)
  cv.appendColumn(c1)

  let c2 = newColumnViewColumn()
  c2.title = "Style"
  c2.setExpand
  let f2 = newSignalListItemFactory()
  f2.connect("setup", setup2)
  f2.connect("bind", bind2)
  c2.setFactory(f2)
  cv.appendColumn(c2)

  let c3 = newColumnViewColumn()
  c3.title = "Group"
  let f3 = newSignalListItemFactory()
  f3.connect("setup", setup3)
  f3.connect("bind", bind3)
  c3.setFactory(f3)
  cv.appendColumn(c3)

  let c4 = newColumnViewColumn()
  c4.title = "Lock"
  let f4 = newSignalListItemFactory()
  f4.connect("setup", setup4)
  f4.connect("bind", bind4)
  c4.setFactory(f4)
  cv.appendColumn(c4)

  let c5 = newColumnViewColumn()
  c5.title = "Vis."
  let f5 = newSignalListItemFactory()
  f5.connect("setup", setup5)
  f5.connect("bind", bind5)
  c5.setFactory(f5)
  cv.appendColumn(c5)

  let c6 = newColumnViewColumn()
  #c6.title = "Vis."
  let f6 = newSignalListItemFactory()
  f6.connect("setup", setup6)
  f6.connect("bind", bind6)
  c6.setFactory(f6)
  cv.appendColumn(c6)

  cv.connect("activate", onColumnViewActivate)

  let gtype = gObjectGetType()
  var listStore = gio.newListStore(gtype)

  for i in 0 .. LayerNames.high:
    let o = newObjectv(ColumnViewGObject, gtype, 0, nil)
    #o.name = Names[i]#.sample
    #o.age = rand(18 .. 95)
    listStore.append(o)

  let model = cast[SelectionModel](newSingleSelection(cast[ListModel](listStore)))
  model.connect("selection-changed", onSelectionChanged)
  cv.setModel(model)
  result = newScrolledWindow()
  result.setChild(cv)

proc activate(app: Application) =
  let window = newApplicationWindow(app)
  window.title = "GTK4 & Nim"
  window.defaultSize = (200, 200)
  window.setChild(createLayersWidget())
  window.present

proc main =
  let app = newApplication("org.gtk.example")
  connect(app, "activate", activate)
  discard run(app)

main()
GTK cookbook
At this location of the book, we will present some unrelated, but maybe useful, code snippets.
Get screen resolution, scale factor, width and height in mm for wayland
Retrieving this data is not that easy. In most cases, we do not need them, as our apps should work everywhere and we should not really care about screen dimensions. But for some tools, like CAD or EDA programs, we may need that data, because when the user desires an absolute line with a thickness of 0.5 mm on the screen, then we should be able to fulfill that wish. Mr. Bassi gave a rough sketch of how we can get the needed data on modern wayland systems:
# https://discourse.gnome.org/t/get-screen-width-and-height/7245/8
import gintro/[gtk4, gdk4, gobject, gio]

proc printData(widget: Button; window: ApplicationWindow) =
  let surface: gdk4.Surface = window.getSurface
  let display: gdk4.Display = surface.getDisplay
  let monitor: gdk4.Monitor = display.getMonitorAtSurface(surface)
  echo monitor.getWidthmm
  echo monitor.getHeightmm
  let geometry: gdk4.Rectangle = monitor.getGeometry
  echo geometry
  echo monitor.getScaleFactor
  echo surface.getScaleFactor

proc activate(app: gtk4.Application) =
  let window = newApplicationWindow(app)
  let button = newButton("Print Data")
  button.connect("clicked", printData, window)
  window.setChild(button)
  window.show

proc main =
  let app = newApplication("org.gtk.example")
  app.connect("activate", activate)
  let status = app.run
  quit(status)

main()
When you run this example, you may see some output like
600
340
(x: 0, y: 0, width: 3840, height: 2160)
1
1
Appendix
Acknowledgments
A lot of missing commas and some more grammar errors have been detected by use of the languagetool.org software, used from the command line with the pyLanguagetool application. Some longer prose sections have been also checked by use of the free Firefox grammar check browser extension of https://www.grammarly.com/ and the online grammar checker from https://quillbot.com.
Text styles
We use semantic markup with these text styles:
-
New text: This is new stuff
-
Recent text: This was recently updated
-
First use: term
-
Italic: This is italic
-
Operators: + - & shl
-
Keywords: var ref object import while
-
Use of proc in text: proc
-
Use of macro in text: macro
-
Data types: float int Table
-
String data type: string
-
Array data type: array
-
Function calls: setLen()
-
Variables: i, j, length
-
Module names: strutils, system, io
-
Literals: 100, false, 3.14
-
Constants: fmWrite
-
Code in text: while a > 0 and not done:
-
Terminal text: nim c -gc:arc test.nim
For the term "proc", which is a Nim keyword, we use no keyword markup, as it occurs so often. Maybe we will later write just procedure instead. And we do the same for the "macro" keyword.
ChangeLog
November 2022
Some grammar and typing errors fixes, mostly missing commas.